Ceramic tiles have become a ubiquitous feature in homes around the world, prized for their durability, versatility, and aesthetic appeal. They are a popular choice for covering floors, walls, and countertops, both in kitchens and bathrooms, and even as decorative accents in living spaces. This widespread usage can be attributed to their ability to withstand heavy foot traffic, resist stains, and add a touch of elegance to any room. As a result, ceramic tiles have become an integral part of interior design, enhancing the overall ambiance of living spaces.
However, despite their numerous advantages, ceramic tiles are not invulnerable. Over time, they can develop cracks, chips, or other forms of damage due to various factors such as heavy impacts, moisture, or wear and tear. It is imperative to know how to repair ceramic tiles to ensure that they maintain both their aesthetic beauty and functionality.
The aesthetics of ceramic tiles play a significant role in the overall appeal of a room. Cracked or chipped tiles not only diminish the visual appeal of a space but also disrupt the seamless flow of a tiled surface. Knowing how to repair ceramic tiles allows homeowners to address such imperfections promptly, preserving the visual harmony of their living spaces.
Moreover, the functionality of ceramic tiles is equally crucial. In areas like kitchens and bathrooms, where these tiles are often used, maintaining a water-resistant and durable surface is essential to prevent further damage or even structural issues. Properly repairing ceramic tiles ensures that they continue to serve their practical purpose by keeping moisture at bay and maintaining a safe and reliable surface for everyday use.
In this guide, we will explore the various methods and techniques for repairing ceramic tiles, empowering homeowners to preserve the beauty and functionality of their tiled surfaces effectively. Whether it’s a minor crack or a larger issue, learning how to repair ceramic tiles can extend the lifespan of these popular home features, ultimately enhancing the longevity and value of your living space.
Understanding common ceramic tile problems
Causes of Cracks and Chips:
Cracks and chips in ceramic tiles can occur due to a variety of factors, often resulting from a combination of circumstances. It’s essential to understand these causes to effectively address the issue:
Impact Damage: One of the most common reasons for cracks and chips in ceramic tiles is direct impact or force. Dropping heavy objects on the tiles or accidentally banging them with sharp objects can lead to immediate damage.
Structural Movements: Houses naturally undergo slight movements and settling over time. These movements can cause the underlying subfloor or wall to shift, putting pressure on the tiles. This pressure can lead to cracks, especially in older homes.
Temperature Changes: Ceramic tiles can expand and contract with temperature fluctuations, causing stress on the tile surface. Over time, this stress can result in cracks, especially in areas with extreme temperature variations.
Poor Installation: Incorrectly installed tiles, such as those with inadequate adhesive or uneven subfloors, are more prone to cracking and chipping. Improper installation can create weak points in the tile structure.
Moisture and Water Damage: Water can seep into the grout lines or beneath the tiles, weakening the adhesive and causing tiles to loosen or crack. This is particularly common in wet areas like bathrooms and kitchens.
How Cracks and Chips Can Worsen Over Time if Not Repaired:
Addressing cracks and chips in ceramic tiles is not just about aesthetics; it’s crucial for the long-term integrity of the tiled surface. If left unrepaired, cracks and chips can lead to several worsening problems:
Water Infiltration: Cracks and chips create openings in the tile surface, allowing water to penetrate beneath the tiles. This can lead to moisture damage to the subfloor or walls, potentially causing structural issues and mold growth.
Weakening Surrounding Tiles: Unrepaired damage can weaken the adjacent tiles, making them more susceptible to cracking as well. This can result in a domino effect where a single damaged tile leads to a larger area of tile problems.
Tripping Hazards: Raised or uneven tile edges caused by chips can create tripping hazards, posing safety risks, especially in high-traffic areas.
Deterioration of Grout: Cracks and chips can cause grout lines to crack or break as well. This weakens the overall tile installation and can allow further moisture infiltration.
Escalating Repair Costs: Neglecting minor cracks and chips can ultimately lead to more extensive damage that requires a more costly and time-consuming repair or even tile replacement.
Understanding the causes and potential consequences of cracks and chips in ceramic tiles emphasizes the importance of timely repairs. In the following sections, we will delve into effective methods for repairing these common tile problems to maintain the aesthetics and functionality of your tiled surfaces.
Loose or Hollow Tiles:
Reasons behind Loose or Hollow Tiles:
Loose or hollow tiles can be a frustrating issue, and understanding the causes is essential for effective repairs:
a. Inadequate Adhesive: Tiles are typically attached to the subfloor or wall with adhesive. If the adhesive was improperly applied or has degraded over time, it can lead to tiles becoming loose.
b. Poor Installation: Incorrect installation techniques, such as insufficient adhesive coverage or improper spacing, can result in tiles not bonding properly with the surface.
c. Moisture Damage: Water infiltration beneath the tiles can weaken the adhesive, causing tiles to become loose. This is especially common in areas prone to water exposure, like bathrooms and kitchens.
d. Subfloor Movement: Subfloor or wall movements, whether due to settling, temperature changes, or structural issues, can cause tiles to loosen over time.
Impact of Loose or Hollow Tiles on the Overall Integrity of the Tiled Surface:
Loose or hollow tiles can have several negative consequences for the overall integrity of the tiled surface:
a. Increased Risk of Further Damage: Loose tiles are more susceptible to cracking and chipping, as they lack proper support. Over time, this can lead to a cascading effect of damage.
b. Safety Hazards: Loose tiles can create uneven surfaces, posing tripping hazards. In high-traffic areas, this can be especially dangerous.
c. Moisture Infiltration: Gaps beneath loose tiles can allow moisture to seep in, potentially leading to subfloor or wall damage and mold growth.
d. Aesthetic Issues: Loose tiles can mar the appearance of the tiled surface, disrupting the overall visual appeal of the area.
Grout Issues:
Common Grout Problems such as Discoloration, Cracking, or Crumbling:
Grout, the material that fills the gaps between tiles, is susceptible to various issues over time:
A. Discoloration: Grout can become discolored due to dirt, mold, or staining agents. This can make the tiled surface look unclean and aged.
B. Cracking: Grout can develop cracks due to shifts in the subfloor or wall, or simply as a result of natural wear and tear.
C. Crumbling: In some cases, grout can deteriorate to the point of crumbling or breaking away, leaving gaps between tiles.
Importance of Addressing Grout Issues to Prevent Further Damage:
Proper grout maintenance is crucial for preserving the integrity of the tiled surface and preventing further damage:
A. Structural Support: Grout not only fills gaps but also provides structural support to the tiles. Cracked or crumbling grout compromises this support, potentially leading to loose or damaged tiles.
B. Water Resistance: Grout seals the gaps between tiles, preventing moisture infiltration. Addressing grout issues promptly is essential to maintain the water-resistant properties of the tiled surface and prevent underlying damage.
C. Aesthetics: Grout is a key element in the visual appeal of tiled surfaces. Discolored or damaged grout can significantly detract from the overall beauty of the tiled area.
In the upcoming sections, we will explore practical solutions and techniques for repairing loose or hollow tiles and addressing grout issues to ensure the longevity and functionality of your ceramic tiled surfaces.
How to repair ceramic tiles step by step guide
Tools and materials needed for ceramic tile repairs
To perform ceramic tile repairs effectively, you’ll need a variety of tools and materials. The specific items required may vary depending on the type of repair you are conducting, whether it’s fixing cracks and chips, addressing loose or hollow tiles, or dealing with grout issues. Here’s a general list of tools and materials commonly needed for ceramic tile repairs:
Tools:
- Safety Gear:
- Safety glasses or goggles
- Work gloves
- Dust mask or respirator (for dust and fumes)
- Tile Repair Kit (Optional): Some kits include a combination of tools and materials for basic tile repairs.
- Chisel: For removing damaged or loose tiles and old adhesive.
- Rubber Mallet: Used with the chisel to gently remove tiles.
- Putty Knife or Spatula: For applying epoxy filler or grout and for smoothing the surface.
- Notched Trowel: Used to apply tile adhesive or mortar.
- Grout Float: For spreading and pressing grout into the gaps between tiles.
- Grout Saw: To remove damaged grout from grout lines.
- Fine-Grit Sandpaper: For smoothing epoxy filler or rough tile edges.
- Sponge and Bucket: Used for cleaning tiles during the repair process.
- Tile Spacer (Plastic Spacers): To maintain consistent grout lines when reattaching tiles.
- Straight Edge or Level: Ensures tiles are properly aligned.
- Measuring Tape: For precise measurements and tile cutting.
- Tile Cutter or Wet Saw (if replacing tiles): Used to cut tiles to size.
Materials:
- Replacement Tiles (if necessary): Matching tiles to replace damaged ones.
- Tile Adhesive or Mortar: To secure tiles to the substrate.
- Epoxy Filler: For repairing cracks and chips in tiles.
- Grout: The type and color should match the existing grout.
- Tile and Grout Sealer (optional): For protecting repaired areas from stains and moisture.
- Cleaning Supplies: Mild detergent, water, and a sponge or cloth for cleaning tiles before and after repairs.
- Disposable Rags or Towels: For cleanup.
- Buckets: For mixing adhesive, mortar, or grout.
- Masking Tape (for precise grout application): Helps create clean grout lines.
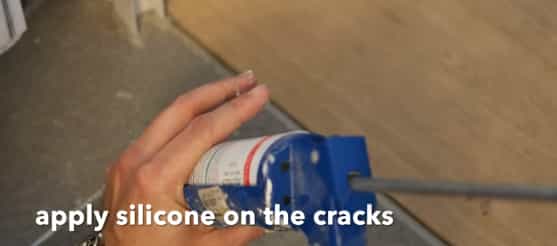
- Sanded Caulk (for edges or corners): To fill gaps in areas where tiles meet walls or other surfaces.
- Latex or Nitrile Gloves: If you prefer to work with gloves to protect your hands.
- Tile Spacers (if replacing tiles): Plastic crosses or T-shaped spacers to maintain even tile gaps.
It’s important to note that the specific materials and quantities you need will depend on the size and scope of your ceramic tile repair project. Always follow the manufacturer’s instructions for the products you use and exercise caution when handling tools to avoid injury or damage to the tiles.
A. Assessing the Extent of Damage and Choosing Appropriate Repair Techniques:
Before you begin repairing ceramic tiles, it’s crucial to assess the extent of the damage and decide on the appropriate repair techniques. Here’s how to get started:
- Inspect the Damage: Examine the tiles and grout carefully to identify cracks, chips, loose or hollow tiles, or grout issues. Take note of the affected areas and their severity.
- Gather Materials: Depending on the type and extent of damage, gather the necessary materials and tools, such as epoxy filler, tile adhesive, grout, a grout saw, a chisel, a rubber mallet, a putty knife, and safety equipment.
- Plan the Repairs: Develop a plan for the repairs, considering the specific techniques required for each type of damage.
B. Repairing Cracks and Chips:
Preparation – Cleaning the Area and Removing Loose Debris:
- Clean the damaged area by wiping it with a damp cloth to remove dirt and dust.
- Use a chisel or a small tool to carefully remove any loose or chipped pieces around the damaged area.
- Allow the cleaned area to dry completely before proceeding.
Filling Cracks and Chips – Using Epoxy Filler and Proper Application Techniques:
- Mix the epoxy filler according to the manufacturer’s instructions. Ensure it has a uniform consistency.
- Apply the epoxy filler to the crack or chip, slightly overfilling the damaged area.
- Use a putty knife to smooth the filler, ensuring it’s level with the tile surface.
- Follow the recommended curing time for the epoxy filler as per the manufacturer’s instructions.
Smoothing and Blending Repaired Area with Surrounding Tiles:
- Once the epoxy filler has cured, gently sand it with fine-grit sandpaper to make it flush with the surrounding tile.
- Wipe away any dust from sanding and clean the entire tiled surface for a seamless finish.
C. Fixing Loose or Hollow Tiles:
Removing the Affected Tile:
- Carefully use a chisel and a rubber mallet to gently break and remove the loose or hollow tile.
- Remove any old adhesive or grout from the substrate to ensure a clean surface.
Preparing the Surface and Applying Tile Adhesive:
- Clean the substrate and ensure it’s dry and free of debris.
- Apply tile adhesive to the back of the replacement tile and the prepared substrate using a notched trowel.
Reattaching the Tile and Ensuring Proper Alignment:
- Carefully place the replacement tile into position, aligning it with the surrounding tiles.
- Press the tile firmly into the adhesive to ensure good adhesion.
- Use spacers to maintain even grout lines.
- Allow the adhesive to dry completely as per the manufacturer’s instructions.
D. Addressing Grout Issues:
Removing Damaged Grout Using a Grout Saw:
- Select a grout saw with the appropriate blade size for your grout lines.
- Carefully and gently remove the damaged grout by running the saw along the grout lines.
- Be cautious not to damage the tiles during this process.
Applying New Grout and Proper Techniques for a Seamless Finish:
- Mix the grout following the manufacturer’s instructions until it reaches a smooth consistency.
- Apply the new grout to the gaps between the tiles using a rubber grout float.
- Press the grout firmly into the gaps and ensure it’s evenly distributed.
- Use a damp sponge to wipe away excess grout from the tile surfaces before it dries.
- Allow the grout to cure as instructed by the manufacturer.
E. Curing and Final Touches for a Professional-Looking Repair:
Curing: Give your repairs adequate time to cure, following the manufacturer’s instructions for the adhesive, epoxy filler, and grout. This is essential to ensure the longevity of your repairs.
Final Cleaning: Once everything has cured, clean the entire tiled surface thoroughly to remove any remaining grout haze or debris.
Sealing (Optional): Consider applying a tile and grout sealer to protect the repaired areas from future damage and stains.
By following these step-by-step instructions, you can successfully repair ceramic tiles, restoring the aesthetics and functionality of your tiled surfaces.
What are problems that can break the ceramic tile?
There are three reasons for which the ceramic tile can be a break; the tile, the grout, and the caulk. You have to learn all the methods to tackle problems related to ceramic tile. The tools necessary for fixing the ceramic tiles are found at any nearby shop.
What is the biggest challenge in replacing the old tiles?
You are replacing old tiles with new faces, a big challenge of being mismatched. The color or old tile fades over the period and doesn’t match with the newly installed tile. You can tackle this problem by creating an entirely new version of tiles, which gives a new look to the room.
How to repair the broken ceramic tile?
We can repair ceramic tiles by the following methods step by step.
- Breaking the tile
- Wear protection while breaking the tile
- Break the grout
- Removal of old adhesion
- Installing the adhesion
- Application of mortar
- Setting the tile
- Leave it dry
- Applying grout again
- Leave the grout to dry
Breaking the ceramic tile
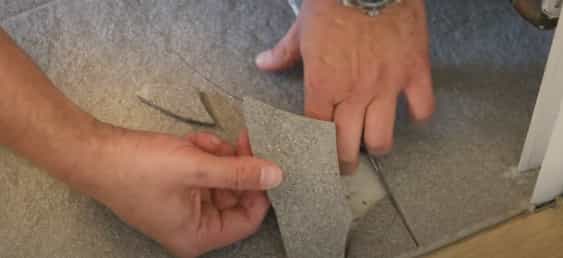
The steps of repairing the tiles are the same, even on the wall or the floor. The first thing you do is to remove the entire tile from the surface. It’s up to you that you need equipment or not?
You can use a screwdriver to remove the ceramic tile. However, if you face a little difficulty, try using a hammer and break the tile into small pieces. Read more, Ceramic sink repair.
Wear protection while breaking the tile
Ceramic is a brittle material. When you hit ceramic tiles with the hammer, small pieces go flying. They can even hit your eyes and face. So, it is better to cover the face and wear protective goggles. You must use gloves in all this process. If you avoid any precautions instructed to you, the consequences will be bad. Also read, how to lay ceramic tiles over the concrete floor?
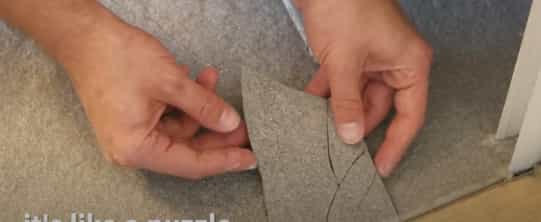
Break the grout, repair ceramic tiles
When you remove the entire tile along with scratches, it’s time to remove grout underneath. Break the grout and take it out. You can use a hammer to break it into pieces. However, please don’t use an excess of force as it can break the other good tiles as well. So, it is better to use light force. You can also use a chisel for this process. Use a chisel with care because chisel is a tough material. If you try using the chisel harshly, all the nearby ceramic tiles will be affected. Check here, how to seal ceramic tile?
Removal of old adhesion, repair cracked ceramic tile
A cold chisel I used to remove old adhesive. Remove maximum of the adhesive from the surface of the wall of the floor. After repeated trials, the surface will give a smoother look. When the entire old adhesive has been removed, apply the vacuum pump and remove all the small particles. There is no other method to remove the old adhesive except the use of a chisel. Using a heat gun will make the job messy, and you will not be able to remove the scratches from the surface. Another best option to remove dust is using gum. Popular content, the best adhesive for ceramic.
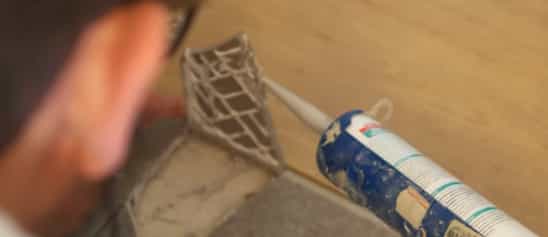
Installing the adhesion to repair ceramic tiles
The next step comes of installing the new tile. For this, we spread adhesion on the surface equally. The type of adhesion we use depends upon the kind of tile we want to install. Ceramic tiles are easy to install, as they get attached to tile quite easily. Related content, how to remove ceramic tile?
Application of mortar, repair broken ceramic tiles
We spread mortar on the surface of the floor or wall. We should remember to spread the mortar equally on all surfaces. The concentration of mortar varies according to tile. Do all this process while you wear the gloves. Because when the mortar dries on bare hand, it becomes difficult to remove it from hand. Apply mortar on the back surface of the tile too. Spread it to all the edges of the tile equally.
Setting the ceramic tile properly
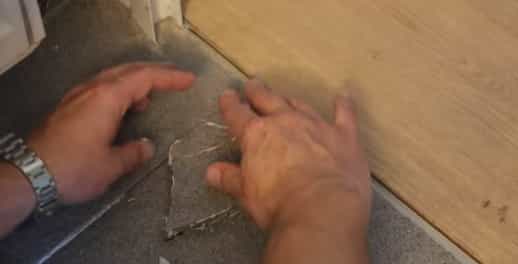
Now it comes to setting up the tile on the surface. Fix the tile in such a way that it is adjusted in the middle of other tiles. The next step is to press the ceramic tile gently. Don’t press the tile directly with a hammer. However, press the tile by placing a short wood on it. They will apply equal pressure all over the ceramic tile. Press the tile until it is leveled with pre-fixed tiles. While doing this, the ooze will come out from the wall of ceramic time. Wipe away all the adhesive from the surface with a plank of clean, smooth wood. You may like, how to make ceramic tiles non-slippery?
Leave it dry
Adhesive will take some time to dry. Usually, it takes 2-3 hours to completely dry. You can use a fan to speed up the drying process, but air dry is the favorite method of all the time. You will move to the next step when the ceramic tile and its adhesion are completely dry.
Applying grout again to repair ceramic tiles
Once all the adhesion applied is dry, we will re-grout the ceramic tile. Nowadays, grout is also available in powdered form in the market. While dealing with the floor, try using sanded grout, and for walls, try using the un-sanded grout. Don’t ever forget to wear gloves in all this process.
We spread the grout across the entire tile using a rubber grout float. While holding the float at 45 degrees, try moving it in both directions. It will equally distribute the grout. Moreover, it is best to fill the gaps between newly installed ceramic tiles, and no space is left over.
Leave the grout to dry
Setting time for grout is different for sanded grout and un-sanded grout. Generally, we give 10-15 minutes to grout to set completely on ceramic. After this, we wipe down the entire surface using a sponge. A damp grout sponge is used to clean the whole surface. Once again, check for whether the ceramic is dry and wipe down completely. Well done. We hope how to repair ceramic tile article is helpful for you.
Tips and tricks for successful ceramic tile repairs
Repairing ceramic tiles can be a challenging task, but with the right tips and tricks, you can achieve successful results. Here are some valuable tips to help you with your ceramic tile repair project:
Safety First:
Always wear appropriate safety gear, including safety glasses or goggles, gloves, and a dust mask or respirator, to protect yourself from potential hazards.
Gather All Materials:
Before you start, ensure you have all the necessary tools and materials ready. This prevents interruptions during the repair process.
Choose the Right Products:
Use tile adhesives, epoxy fillers, and grouts that are compatible with ceramic tiles. Check for products specifically designed for your tile type and the repair you’re conducting.
Match Tile Colors and Styles:
If you’re replacing tiles, choose replacements that closely match the color, style, and size of the existing tiles to achieve a seamless look.
Clean Thoroughly:
Clean the repair area and the tiles surrounding it meticulously. Remove any dirt, dust, grease, or grime, as a clean surface ensures better adhesion and grout performance.
Prepare Surfaces Properly:
When removing damaged tiles, scrape away any old adhesive and ensure the substrate is clean, dry, and level. Adequate surface preparation is crucial for a successful repair.
Work in Small Sections:
If you’re repairing a larger area, work in smaller sections to manage the adhesive, epoxy, or grout application more effectively. This prevents materials from drying out before you can finish.
Mix Adhesives and Grout Carefully:
Follow the manufacturer’s instructions for mixing adhesive, mortar, epoxy, or grout. Achieving the right consistency is vital for proper adhesion and grout fill.
Remove Excess Material Promptly:
After applying adhesive, epoxy, or grout, promptly clean away any excess material from tile surfaces with a damp sponge. Avoid letting it harden, as removing it later can be challenging.
Maintain Consistent Grout Lines:
Use tile spacers or masking tape to ensure consistent and even grout lines between tiles.
Smooth Edges and Joints:
Use a putty knife or your fingertip to shape and smooth the grout lines and ensure a clean, finished appearance.
Allow Adequate Curing Time:
Be patient and allow the adhesive, epoxy, or grout to cure for the recommended duration specified by the manufacturer. Rushing this step can compromise the repair.
Seal Grout and Repaired Areas (Optional):
Consider applying a tile and grout sealer to protect your repair work from stains and moisture, especially in high-traffic or moisture-prone areas.
Test for Color Matching:
If you’re using a different batch of grout or adhesive, test it in an inconspicuous area first to ensure it matches the existing color when it dries.
Clean Tools and Surfaces Immediately:
Clean your tools and wipe tile surfaces promptly after completing the repair. This prevents hardened adhesive, epoxy, or grout from marring the finished look.
Keep Spare Tiles:
When installing new tiles, keep a few extra in case you need replacements in the future. This ensures a consistent look if damage occurs again.
Seek Professional Help When Needed:
For complex or extensive repairs, or if you lack experience, consider hiring a professional tile installer or contractor to ensure a high-quality result.
By following these tips and tricks, you can enhance your chances of achieving successful ceramic tile repairs while maintaining the aesthetics and functionality of your tiled surfaces.
FAQs
Certainly! Here are some frequently asked questions (FAQs) on how to repair ceramic tiles:
Can I repair ceramic tiles myself, or should I hire a professional?
Whether you can repair ceramic tiles yourself depends on the extent of the damage and your DIY skills. Small cracks, chips, and grout issues are often manageable for DIY enthusiasts. However, for extensive damage or if you’re unsure, it’s advisable to consult a professional tile installer to ensure a high-quality repair.
How can I match the color of my replacement tiles with the existing ones?
Finding an exact color match can be challenging, especially for older tiles. When replacing tiles, try to obtain replacements from the same manufacturer or source. You can also bring a sample tile to a tile store for assistance in finding a close match.
Do I need to replace the entire floor or wall if I have a few damaged tiles?
No, you don’t need to replace the entire surface for a few damaged tiles. You can remove and replace only the affected tiles, ensuring they match the existing ones as closely as possible.
What’s the difference between epoxy filler and regular tile adhesive for repairs?
Epoxy filler is used to repair cracks and chips in tiles. It provides a durable and waterproof bond. Tile adhesive, on the other hand, is used to attach tiles to the substrate. Use epoxy filler for repairing tile damage and tile adhesive for installing new tiles or reattaching loose ones.
How long does it take for tile adhesive, epoxy filler, or grout to dry and cure?
The drying and curing times can vary depending on the product and manufacturer’s instructions. Typically, tile adhesive can set in 24 hours, epoxy filler may take several hours to cure fully, and grout may take 24 to 48 hours to cure. Follow the manufacturer’s recommended times for the best results.
Can I repair tiles in a shower or wet area myself?
You can repair tiles in wet areas yourself, but it’s crucial to use waterproof materials like epoxy filler, waterproof adhesive, and mold-resistant grout. Ensure that the repairs are done thoroughly to prevent water infiltration, which can lead to further damage or mold growth.
How can I prevent future damage to my ceramic tiles?
To prevent future damage, use area rugs or mats in high-traffic areas, avoid dropping heavy objects on tiles, keep grout lines sealed and clean, and address any issues promptly. Regular cleaning and maintenance can also help extend the life of your ceramic tiles.
What should I do if my tiles are discontinued, and I can’t find replacements?
If your tiles are discontinued and finding exact replacements is impossible, consider replacing the damaged tiles with tiles that complement the existing ones in terms of color and style. This can create a deliberate design feature, like a mosaic or decorative pattern, to mask the difference.
Can I repair tiles over old grout or adhesive?
It’s generally not recommended to repair tiles over old grout or adhesive, as it may compromise the bond and result in an unstable repair. Ensure that the surface is clean, dry, and free of old adhesives or grout before making repairs.
Is it necessary to seal grout after a repair?
Sealing grout is not always necessary, but it can help prevent staining and moisture infiltration, especially in high-traffic or moisture-prone areas. Consider sealing the grout to prolong its life and maintain the appearance of your repair work.
Conclusion
In conclusion, knowing how to repair ceramic tiles is a valuable skill that can help homeowners maintain the aesthetics and functionality of their tiled surfaces. Ceramic tiles are a popular choice for homes due to their durability and versatility, but over time, they can develop cracks, chips, or grout issues. Prompt and proper repairs are essential to prevent further damage and ensure the longevity of these beautiful and practical home features.
Repairing ceramic tiles involves a step-by-step process that begins with assessing the extent of the damage and choosing the appropriate repair techniques. Whether you’re dealing with cracks, chips, loose tiles, or grout problems, each repair requires careful preparation, application of suitable materials, and attention to detail.
Key takeaways from this guide include:
- Understanding the common causes of ceramic tile problems, such as impact damage, moisture issues, and structural movements, is crucial in addressing them effectively.
- Recognizing the importance of timely repairs to prevent worsening damage, maintain visual appeal, and ensure the practicality of tiled surfaces.
- The step-by-step guide to repairing ceramic tiles covers the essential aspects of the repair process, from assessing damage to curing and final touches, providing homeowners with the knowledge and confidence to tackle repairs on their own.
- Safety precautions, proper material selection, surface preparation, and careful execution are critical for successful ceramic tile repairs.
- Additional tips and FAQs offer valuable insights and solutions to common concerns that may arise during the repair process.
In mastering the art of ceramic tile repairs, homeowners can not only extend the life of their tiled surfaces but also enhance the overall beauty and functionality of their living spaces. By following the guidance provided in this comprehensive guide, you are well-equipped to address a variety of ceramic tile issues, ensuring that your home remains a showcase of enduring elegance and practicality.