Nowadays, we print our photos on ceramic mugs. This process makes the pottery look beautiful and charming. However, placing your pictures on a ceramic mug is a less complicated process. Hence, anyone with basic knowledge of it can perform the process. Today, we will discuss two processes of how to print on ceramic mugs at home and other wares.
Best Way to Print on Ceramic Mugs
Printing on ceramic mugs at home can be a fun and creative DIY project. Here’s a step-by-step guide to help you get started:
Materials You’ll Need:
- Ceramic mugs
- Printable design or image
- Waterslide decal paper (for inkjet or laser printers)
- Clear acrylic sealant (optional)
- Scissors
- A bowl of lukewarm water
- Soft cloth or paper towels
- Clear adhesive tape (optional)
- An oven
Step 1: Choose Your Design
Select the design or image you want to print on your mugs. You can create your own design or find printable images online.
Step 2: Prepare Your Design
Edit and size your design to fit the mug’s surface. Make sure it’s the right size and orientation.
Step 3: Print on Waterslide Decal Paper
Print your design onto waterslide decal paper using an inkjet or laser printer, depending on the type of paper you have.
Step 4: Cut the Decal
Trim the printed decal as closely as possible to your design. Leave a small border around the edges if desired.
Step 5: Soak the Decal
Fill a bowl with lukewarm water. Submerge the decal in the water for about 30 seconds, or as recommended by the decal paper instructions. The backing paper will start to separate from the decal.
Step 6: Apply the Decal
Carefully slide the decal off the backing paper and onto the ceramic mug. Position it where you want the design to appear. Use a soft cloth or paper towel to gently smooth out any air bubbles or wrinkles, starting from the center and moving outward.
Step 7: Dry the Decal
Allow the decal to air dry for a few hours or as instructed by the decal paper manufacturer. Ensure it adheres well to the mug.
Step 8: Seal the Decal (Optional)
For added durability, you can spray a clear acrylic sealant over the decal. Be sure to follow the manufacturer’s instructions for the sealant.
Step 9: Bake the Mug
Place the mug in a cold oven and then set the temperature according to the decal paper’s instructions (usually around 200-225°F or 93-107°C). Bake the mug for the recommended time to set the decal. This usually takes 10-15 minutes.
Step 10: Cool and Enjoy
After baking, carefully remove the mug from the oven and let it cool completely. Wash it gently by hand, avoiding abrasive scrubbers or a dishwasher, to preserve the decal.
Printing on ceramic mugs at home allows you to create personalized and custom designs for yourself or as gifts. Be patient and precise during the process, and you’ll be sipping from your beautifully decorated mug in no time.
Electric Iron Method: How to print on ceramic mugs at home
You can print or install your images on the Mug by this method. This process is completed in different steps.
There are different materials required to perform this process, as mentioned below.
- Electrical iron
- Mugs
- Inkjet printer
- Scissors
We’ll start step by step:
Selection of Mug
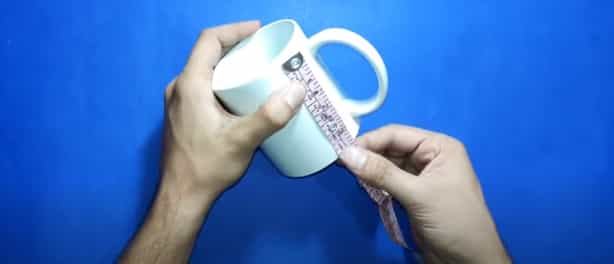
Different types of masks are available in the nearby market. You can choose any ceramic mug and paste your image on it. It would help if you were careful about the selection of mugs. For example, if the color of the Mug and photo exactly match then, it will not give a good look. Try to have a contrast between the mark color and the photo you want to print on it. It is best to use white color ceramic mug and use a dark photo. Read more, Starbucks ceramic travel mug.
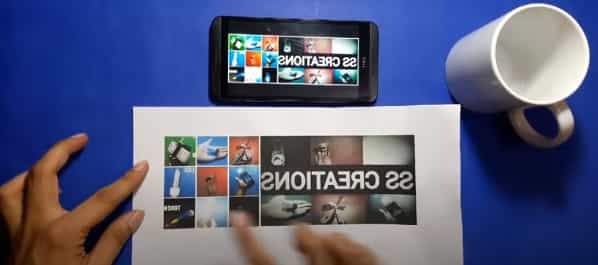
Selection of picture
The next step is the selection of photos. After selecting the photo, you need to print it out. It would be best if you cared about the resolution of the image. If the resolution is not good, then it will give a dully look upon pasting. Also read, How to Paint Ceramic Mugs?
Print photo on paper
After the paper is selected, you need to print it on the paper. But I do remember that the paper used for printing is not simple. You should use the sublimation paper for this purpose. The sublimation paper has the quality that it can transfer the image on any hard surface. We often call sublimation paper transfer paper or decal paper. Check here, Ember temperature control ceramic mug.
Attaching the picture
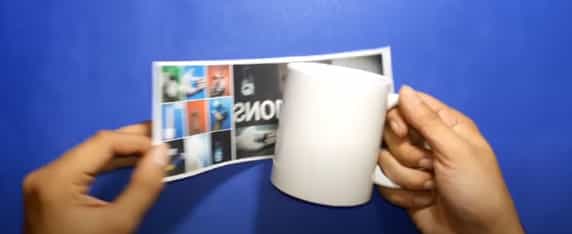
Now it’s time to paste the image onto the surface. You can paste the image in any direction or dimensions you want. It depends upon the type of image we are going to use. You can fix it single side or wrapped around a mug. Before placing the image, make sure that you have cleaned them thoroughly. Remove any text or dost from the surface of the Mug. Now use a tap to fix the image. While pasting the image on the Mug, make sure that the paper wasn’t shifted. Related article, Ceramic Mug Ideas.
Heating the mug surface
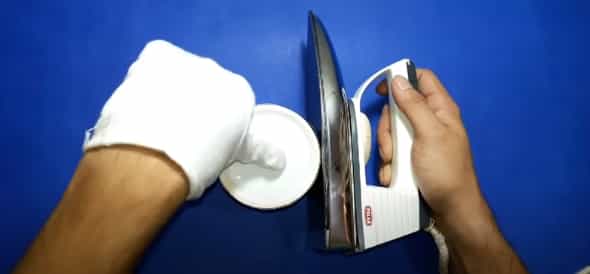
Once you have tasted your image on the surface, you need to heat the surface. In this method, we will take the help of electric iron to heat the surface. The duration of this meeting is not so long. Normally we continue this process for 2 to 3 minutes. During this duration, the picture gets transferred to the mug surface. A popular article, how to paint a ceramic lamp?
Clean the surface of the ceramic mug
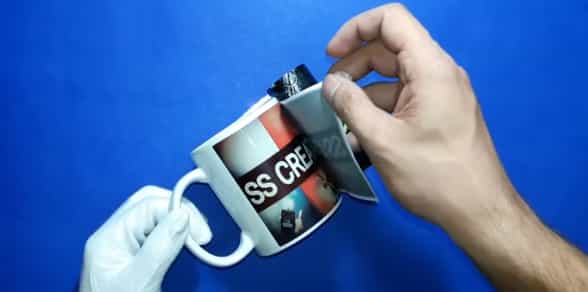
After you have heated the image for 2 to 3 minutes now, it’s time to remove the transfer paper. Be very careful while removing the transfer paper. A jerk can disturb the image formation on the Mug. Try to peel off the transfer paper very carefully. You should use your thumbnails for this purpose. After you have peeled off the transfer paper, clean the Mug thoroughly.
Heat Press method: How to install photos on ceramic mugs at home
This is the second method utilized to paste pictures on mugs and pottery. It is completed in many steps and utilizes the use of an oven instead of an electric iron.
This procedure is comprised of the following steps
- Choose your photo
- Print your photo
- Cut your photo to fit your ceramic Mug
- Adjust the setting of your sublimation mug press
- Put your Mug into the heat press
- Remove mug
- Cooling
We’ll start our process step by step
Choose your photo
This is the first step in the sublimation process. Choosing the photo is easy. However, you should be careful. While choosing the photo, remember this thing the Mug should have a special coating for sublimation printing. The mugs, having especially courting for sublimation, are manufactured in the factory. You cannot make courting the Mug yourself.
Print your photo
Once you have selected the photograph now, you will go to print your photo on paper. Additionally, do remember to use the transfer paper. The transfer paper quality should be good. Equally important, remember to coat on the right side or paper.
Cut your photo-fitting Ceramic Mug
While cutting the paper, remember to cut paper from both sides. Additionally, paper is cut in a way that it should be smaller than a mug. So, it can come fit on your Mug, and give a proper look to it. However, take care that the paper is pressed firmly.
Adjustment
For the preparation of the mug sublimation printer, the temperature is set to four hundred degrees Fahrenheit. It is set up on “medium heavy”, and the timer for its adjustment is set from 4 to 6 minutes.
Placing the ceramic mug into the heat press [Print on ceramic mugs at home]
While the temperature of 400 Fahrenheit is obtained, we are ready to heat press the Mug.
We carefully place the Mug into a heat press. Moreover, take care of the transfer paper as well. Take care that the transfer paper is not wrinkled or folded while putting the Mug into the heat press. Now, we close the pressure gently and start the sublimation process.
Remove the ceramic mug
After waiting for the desired time, we open the heat press and remove the Mug carefully. We remove the Mug using heat resistance often meet because the Mug will be hot.
This step is very important. We should remove the Mug, and after removing the Mug, we should remove the tape on the mark. This is done very carefully because it will disturb the whole layout if we don’t do it carefully. Additionally, all our effort will be wasted. We can use a knife or tweezers to remove the tap from the transfer paper.
Allow it to cool
After we remove the tapes from the Mug, our process is almost complete. The next step is to cool down over newly made products. It is an easy process and requires no experience. Put aside your Cup and allow it to cool for a long period.
Please do not touch the Cup while it is hot from any side. You guys do that. Please do not put your Cup into the refrigerator to cool it down quickly. Let nature cool it down, and if you want to use a fan to cool it quickly, it will be a better Idea. So, guys, we hope that the how-to print ceramic mugs at home article help you out. Thanks for joining us with installing photos on the ceramic mugs article. Goodbye!
Tips and Tricks for Perfecting Your Ceramic Mug Print
Certainly, here are some additional tips and tricks to perfect your ceramic mug print when printing at home:
Troubleshooting Common Issues During Printing:
1. Smudging or Fading of Prints:
- Ensure your ceramic mugs are clean and free from oils or residues before applying the decal.
- Use high-quality decal paper and make sure your printer settings are optimized for the best print quality.
- Allow the ink to fully dry on the decal paper before applying it to the mug.
- Avoid handling the printed decal with wet or oily hands.
2. Uneven or Incomplete Transfer of Designs:
- Smooth out the decal on the mug surface carefully to eliminate air bubbles or wrinkles.
- Ensure the mug surface is flat and free from any imperfections.
- Press down firmly when applying the decal to ensure proper adhesion.
- If a section of the decal doesn’t adhere properly, you can gently lift it and reapply while the decal is still wet.
Adding Additional Details or Accents to Enhance the Design:
1. Using Ceramic Markers or Paint Pens:
- After the decal has dried and been baked onto the mug, you can use ceramic markers or paint pens to add personal touches, names, dates, or additional designs.
- Allow the marker or paint to dry completely before using the mug again.
- Most ceramic markers or paint pens require baking to set the design permanently, so follow the instructions provided by the manufacturer.
2. Incorporating Other Decorative Elements:
- Get creative by adding other decorative elements like rhinestones, stickers, or decals.
- You can create a theme for your mugs (e.g., holidays, seasons, or special occasions) by combining different decorative elements.
- Make sure any additional elements are safe for use on food and drink containers and can withstand the heat of baking if required.
General Tips:
- Practice on spare ceramic pieces or old mugs before attempting your final design to gain confidence and perfect your technique.
- Always read and follow the instructions provided by the decal paper manufacturer and any additional products you use.
- Be patient and take your time to ensure a clean and professional-looking design.
- Hand wash your printed ceramic mugs to prolong the life of the design. Avoid abrasive scrubbers and dishwashers, as they may cause the design to deteriorate over time.
By troubleshooting common issues and adding creative touches, you can elevate your ceramic mug printing projects and produce stunning, personalized mugs that make for great gifts or personal keepsakes.
Caring for and Preserving Your Printed Ceramic Mug
To care for and preserve your printed ceramic mug, hand washing is essential. Avoid abrasive scrubbers and dishwashers, as they can cause the design to deteriorate over time. Instead, gently wash the mug with a mild detergent and a soft sponge or cloth. Be mindful not to scrub too vigorously around the printed area.
Additionally, store your mug in a safe place to prevent chipping or cracking. With proper care, your printed ceramic mug will maintain its vibrant design and sentimental value for years to come, making it a cherished item for daily use or special occasions.
A. Proper Cleaning Methods to Maintain the Print’s Longevity:
1. Hand-Washing vs. Dishwasher:
- Hand-washing is the preferred method to maintain the longevity of the print. Avoid using abrasive scrubbers that may scratch the design.
- If you choose to use a dishwasher, place the mug on the top rack and select a gentle, low-heat cycle. Frequent dishwasher use may still cause the print to fade over time.
2. Recommended Cleaning Agents:
- Use mild detergents and non-abrasive sponges or soft cloths when hand-washing.
- Avoid harsh chemicals or abrasive cleaning agents that can damage the print or the ceramic surface.
B. Ensuring the Design Remains Intact Over Time:
1. Overcoating the Print with a Protective Sealant:
- To add an extra layer of protection, consider applying a clear acrylic sealant over the print. Follow the manufacturer’s instructions for proper application and drying times.
- The sealant can help prevent fading and minor scratches, but it’s best to avoid excessive contact with abrasive materials even when sealed.
2. Storing the Mug with Care to Prevent Damage:
- Store your printed ceramic mug away from other hard or sharp objects that may chip or crack it.
- Consider using individual cup sleeves or soft fabric pouches to protect the mug when not in use.
- Be cautious when stacking or storing mugs, as excessive pressure can cause damage to the design.
By following these care guidelines, you can ensure your printed ceramic mug remains vibrant and in excellent condition over time, allowing you to enjoy its personalized design for years to come.
FAQs
Certainly, here are some frequently asked questions (FAQs) about printing on ceramic mugs at home:
Can I use any type of ceramic mug for printing at home?
While many ceramic mugs can be used for printing, it’s best to choose ones that have a smooth and clean surface. Avoid mugs with cracks, chips, or uneven surfaces for better results.
Do I need a special printer to print on ceramic mugs?
You can use a standard inkjet or laser printer to print on waterslide decal paper designed for mugs. No special printer is required.
How do I ensure the print on the ceramic mug won’t fade quickly?
To prolong the print’s life, hand-wash the mug gently and avoid abrasive cleaning agents or dishwashers. Optionally, you can apply a clear acrylic sealant to protect the design.
Can I print on colored ceramic mugs, or should I stick to white ones?
Printing on white ceramic mugs usually results in the most vibrant colors. While you can print on colored mugs, the design may appear differently due to the underlying color.
Can I use ceramic markers or paint pens to touch up the design after printing?
Yes, ceramic markers or paint pens can be used to add details or accents after printing. Follow the manufacturer’s instructions for best results.
How do I fix a mistake if I place the decal on the mug incorrectly?
If the decal is still wet, gently lift and reposition it. If it’s dried, you may need to start over with a new decal.
Can I use the printed ceramic mug immediately after applying the decal?
It’s best to allow the decal to dry and set properly before using the mug to ensure the design adheres well.
Can I print on ceramic mugs without baking them in an oven?
Baking the mug is usually necessary to set the design permanently and make it dishwasher-safe. Follow the instructions provided with the decal paper.
Can I print on ceramic mugs with a regular inkjet printer, or do I need a special ink?
You can use a regular inkjet printer, but it’s important to use waterslide decal paper designed for mugs. This paper is compatible with standard printer ink.
Are there any safety concerns when using printed ceramic mugs for hot beverages?
If you’ve followed the printing and baking instructions correctly, printed ceramic mugs should be safe for hot beverages. However, avoid extreme temperature changes, as they may affect the design’s durability.
Conclusion
In conclusion, printing on ceramic mugs at home can be a rewarding and creative DIY project, allowing you to personalize your drinkware with unique designs and memories. By following the steps outlined in the guide on “How to print on ceramic mugs at home,” you can achieve professional-looking results and enjoy your custom mugs for years to come.
Remember to choose your mugs carefully, ensure proper printing and drying times, and take care when washing and storing your printed mugs to maintain their longevity. Whether for personal use or as thoughtful gifts, printing on ceramic mugs offers a delightful way to express your creativity and make every sip a bit more special.
Great Article it its really informative and innovative keep us posted with new updates. its was really valuable. thanks a lot.