People usually choose ceramic flooring due to its quality and durability as compared to wood flooring and carpet. But, is also sometime popped up. Here I’m going to show you how to fix ceramic tile popping up?
Carpet causes allergic reactions and is not suitable for health, and wood floating does not have enough lifespan compared to ceramic tiles.
But if ceramic tiles are not installed properly, it may affect their durability and leads them to bulge up and make your house unpresentable. First, you should know about the reasons leading to this problem so that you should take care of these situations next time.
In this article, I am going to tell you how to fix popped-up ceramic tiles? And the reasons leading to it with bonus information .so, let dive into it without wasting our precious time!
Reasons for popped up ceramic tiles
Improper tiling
Proper cleaning is needed for the uniform bonding layer before installation, and if not, it may result in buckled tiles.
Floor expansion
Tiles are permeable, so due to expansion, they may swell with high moisture absorption. The pressure may cause the tiles to pop up.
Uneven subfloor
Uneven subflooring may lead to not having uniform bonding with adhesive or mortar with the tiles and subfloor and can cause popped-up tiles and make them miserable.
Improper tiles set
If we use large and over sized tiles in our house flooring, we require certain troweling techniques to ensure that they achieve a strong bond with it. We need to give a gentle whack with the wooden object to set them in adhesive when the tiles are installed. The tiles which are installed without adhesive also end up bulging. Read more, repair ceramic tile.
No or incorrect movement joints
If you do not do the correct installation of the moment joint, it also leads to the buckling tiles.
The poor quality bonding agent
Bonding agents are used to fixing the underlying substance bond. If we do not use a good quality bonding agent, any slight change in an environment, like changing temperature change in humidity, will lead to lose the grip and cause the tiles to be popped up and buckle up.
Poor quality tile adhesive
If poor quality of the adhesive is used and the tile is exposed to sunlight, then the direct sunlight will lead to an expansion of the tile so, it may lead to pop up and buckle if the adhesive is not strong.
Improper bonding material
Improper bonding materials are another reason for tile damage. If a dry powder is used, you have to check whether it is mixed or not to prevent the popped-up tiles and bulged tiles.
Old tiles
Old tiles old get brittle and lose their flexibility with time and cannot cope with the temperature variations, and end up in a mess. Check here, how to repair hairline crack in ceramic tile?
Bent tiles
Sometimes people use already bent tiles. So, it is obvious that they will end up bad if they use such materials in construction.
Not enough gap
Tiles usually contract and expand, and it is a natural process. Skilled contractors know about it and give proper gaps to the tiles, but some inexperienced contractors do not provide appropriate tiles, resulting in tiles bulging up.
Replacing a single popping up ceramic tile
- First of all, try to solve the issue with replacing a damaged tile by finding a new matching replacement tile.
- Make gaps between the tile you want to remove and the tile along with it by using a utility knife to cut out the remaining grout and make gaps.
- Use the chisel to remove the tile making sure not to damage the attached tile.
- Wipe the area with a wet sponge to remove dust and damp the would to help it bond to the adhesive and clear out all the adhesive.
- Apply new adhesive
- To create stronger connections, create a notch in the adhesive.
- Make sure that the tiles are leveled and lined up correctly.
- Find matching grout
- Apply the grout, and once the grout is done, remove excess grout using a wet sponge
- Try to keep away from newly installed tile at least for 24 hours.
- Then wipe away the Grout residue with a wet sponge.
- Buff with a dry sponge.
Precautions to remove your current floor

- A sledgehammer will damage the underlying structure of your floors, so never use a sledgehammer.
- If you want tikes pieces not to move to another room, use tape to block the space under the door.
- Clean the area and prepare to get started.
- To dispose of the removed tiles, use heavy-duty demo bags.
- Break up the Defected tiles and use small hand Hammers for this purpose
- Ensure that the adhesive and the surface are not dry to ensure a proper bond when applying a tile.
- Use appropriate safety equipment.
- Installing a new tile floor
- First, make sure that you have a solid substrate to install tile on it.
- The best surface to install tiles is on the cement board, but you can also install it on plywood.
- Install the cement boards in full sheets.
- Use a flooring screw to attach the substrate.
- Start your tile installation process from the center of your room.
- The Grout line in the center of the high traffic area will receive excessive traffic, so you will never want a grout line in the center of the high traffic area.
- For thinner tiles, you can use a snap cutter to cuts the tiles.
- For thicker tiles, you can use a wet screw or rent it to cut the tiles.
- To create ridges in your adhesive notch trawl, it helps produce a suction effect when the tile is pressed into them.
- Make an even grout line using a plastic tile spacer.
- Only make as much grout that can be used in 30 minutes because it dries and cannot be used again.
Best Way to Fix Ceramic Tile Popping Up
Fixing ceramic tiles that are popping up or coming loose is essential for maintaining the aesthetics and functionality of your tiled surface. Here’s a step-by-step guide on how to address this issue:
Materials You’ll Need:
- Replacement Tiles: If any tiles are cracked or beyond repair, have replacement tiles on hand that match the size, color, and style of your existing tiles.
- Chisel or Putty Knife: For removing loose tiles and old adhesive.
- Hammer: To gently tap tiles back into place and for removing damaged tiles.
- Adhesive: Use a suitable adhesive for ceramic tiles. Thin-set mortar or tile adhesive is commonly used.
- Grout: To fill the gaps between tiles once they are repositioned.
- Grout Float: For spreading and smoothing grout.
- Sponge: To clean excess grout and ensure a neat finish.
Step-by-Step Guide:
Safety First: Before you begin, wear safety goggles to protect your eyes, and if necessary, use a dust mask when removing old adhesive or grout.
Assess the Damage: Identify the tiles that are popping up or loose. Inspect them for damage, as cracked or broken tiles may need replacement.
Remove Loose Tiles: Use a chisel or putty knife to carefully remove the loose or popping tiles. Start by inserting the chisel or putty knife under the edge of the tile and gently lifting it. Be cautious not to damage the adjacent tiles.
Clean the Substrate: Once the loose tiles are removed, clean the substrate (the surface beneath the tiles) to remove any old adhesive or debris. Ensure it’s smooth and level.
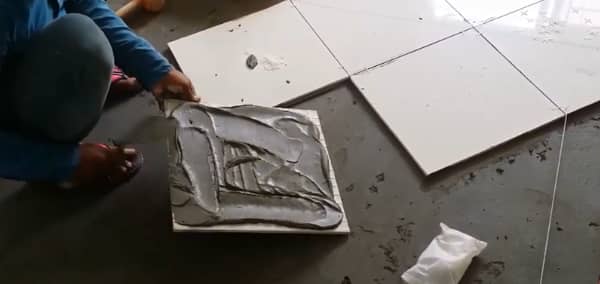
Apply Adhesive: Using a trowel or a notched trowel, apply a thin layer of adhesive to the cleaned substrate. Ensure the adhesive is evenly spread and has a consistent thickness.
Reposition the Tiles: Carefully press the removed tiles back into place, ensuring they are aligned correctly and at the same level as the surrounding tiles. You may need to gently tap the tiles with a hammer and a piece of wood to ensure they are firmly set.
Grout the Joints: Once the tiles are in place and the adhesive has dried (follow the manufacturer’s recommended drying time), use a grout float to apply grout to the joints between the tiles. Ensure the grout is spread evenly and fills all gaps.
Clean Excess Grout: Wait a few minutes for the grout to set slightly, then use a damp sponge to clean off any excess grout from the tile surfaces. Rinse the sponge frequently to achieve a neat finish.
Final Cleanup:
After the grout has fully dried (usually 24-48 hours), polish the tiles with a clean, dry cloth to remove any remaining grout haze.
Seal Grout (Optional): To protect the grout from stains and moisture, consider applying a grout sealer following the manufacturer’s instructions.
Fixing ceramic tiles that have popped up or come loose can restore the beauty and functionality of your tiled surface. With proper care and maintenance, your tiled area will look great and remain secure for years to come.
How to Prevent Popping up Ceramic Tile
Preventing ceramic tiles from popping up or coming loose is essential for maintaining the integrity of your tiled surfaces. Here are some tips to help you prevent this issue:
Proper Installation:
Ensure that the tiles are installed correctly from the beginning. This includes using the right adhesive, the correct adhesive application technique, and ensuring proper tile alignment and spacing.
Substrate Preparation:
The surface beneath the tiles, known as the substrate, should be well-prepared. It should be clean, level, and free of dust, debris, or any loose material that could affect tile adhesion.
Use Quality Materials:
Invest in high-quality adhesive and grout specifically designed for ceramic tiles. Quality materials are more likely to provide a long-lasting bond.
Follow Manufacturer’s Instructions:
Always follow the manufacturer’s instructions for the adhesive, grout, and tiles you are using. Different products may have specific requirements for application, drying times, and curing.
Proper Mixing:
Mix adhesive and grout according to the manufacturer’s recommendations. Use the correct proportions of water and powder to ensure proper consistency.
Back-Buttering Tiles:
For larger tiles, consider back-buttering, which involves applying adhesive to the back of the tile in addition to the substrate. This helps ensure a strong bond.
Avoid Overly Wet Mixes:
Avoid using excessively wet adhesive or grout mixtures. Thin-set mortar or adhesive should be of a consistency that allows the tile to be securely embedded without excessive squeezing out when it’s pressed into place.
Proper Curing Time:
Allow the adhesive and grout to cure for the recommended amount of time before subjecting the tiled surface to heavy use or foot traffic. Rushing this process can weaken the bond.
Use Expansion Joints:
For large tiled areas, use expansion joints to allow for natural expansion and contraction due to temperature and humidity changes. These joints help prevent undue stress on the tiles.
Regular Inspection and Maintenance:
Periodically inspect your tiled surfaces for any signs of loose or popping tiles. If you notice any issues, address them promptly to prevent further damage.
Avoid Heavy Impact:
Be cautious when moving heavy objects or dropping heavy items onto tiled surfaces. Sudden impacts can weaken the adhesive bond over time.
Grout Maintenance:
Regularly inspect and maintain the grout lines between tiles. Cracked or deteriorating grout can allow moisture to penetrate, which can weaken the adhesive and cause tiles to come loose.
By following these preventive measures and ensuring proper installation and maintenance, you can significantly reduce the risk of ceramic tiles popping up or becoming loose, preserving the beauty and functionality of your tiled surfaces.
FAQs
Certainly! Here are some frequently asked questions (FAQs) about fixing ceramic tiles that are popping up or coming loose:
Why are my ceramic tiles popping up or coming loose?
There are several reasons for tiles to pop up, including inadequate adhesive, improper installation, substrate issues, or moisture penetration. Identifying the specific cause is essential for effective repairs.
Can I fix a single loose tile without removing surrounding tiles?
Yes, it’s possible to fix a single loose tile without removing the surrounding tiles. You can carefully lift the loose tile, clean the area, reapply adhesive, and then reposition the tile.
Do I need to replace cracked or damaged tiles when fixing loose tiles?
Cracked or severely damaged tiles should be replaced, as they can compromise the integrity of the tiled surface. Replace them with new tiles that match the existing ones.
Is it necessary to use a specific adhesive for ceramic tile repairs?
It’s essential to use an adhesive designed for ceramic tiles. Thin-set mortar or ceramic tile adhesive is commonly used for these repairs due to their bonding strength and durability.
Can I fix loose tiles without removing grout?
In most cases, it’s necessary to remove the grout around the loose tile to access and lift it. After fixing the tile, you can reapply grout to fill the gap.
How long does it take for the adhesive to dry when fixing loose tiles?
The drying time for adhesive can vary depending on the product and environmental conditions. It typically takes 24-48 hours for the adhesive to fully cure, but follow the manufacturer’s instructions for precise drying times.
Can I prevent tiles from popping up in the future?
Yes, you can prevent tiles from popping up by ensuring proper installation, using quality materials, preparing the substrate correctly, and conducting regular inspections and maintenance.
Should I hire a professional for tile repairs, or can I do it myself?
Minor tile repairs, such as fixing a single loose tile, can often be done by homeowners with some DIY experience. However, for extensive repairs or if you’re uncertain about the cause of the issue, consulting a professional may be advisable.
Can I use the same grout for repairs as the original grout?
Using the same grout as the original is ideal for maintaining consistency in appearance. However, ensure that the original grout is still available and matches the existing grout color.
How can I tell if a tile is loose without causing further damage?
Gently tap the tile with a wooden or rubber mallet. If it makes a hollow sound or moves slightly, it may be loose. Be cautious not to apply excessive force, which could break the tile.
Conclusion
In conclusion, knowing how to fix ceramic tiles that are popping up or coming loose is a valuable skill for homeowners and DIY enthusiasts. These repairs can not only restore the aesthetics of your tiled surfaces but also prevent further damage and the need for costly replacements.
By following the step-by-step guide provided earlier and addressing the specific causes of tile issues, you can maintain the integrity and longevity of your ceramic tile installations. Remember to use quality materials, adhere to manufacturer instructions, and exercise care and patience throughout the repair process.
Preventive measures, such as proper installation, regular inspections, and substrate preparation, are equally important in ensuring that your ceramic tiles remain firmly in place over time. With these techniques and a proactive approach, you can enjoy beautifully tiled surfaces that stand the test of time.