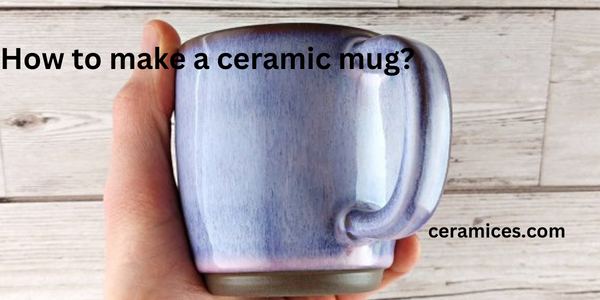
Ceramic mugs are one of our daily usable items in the morning, afternoon, and night. Usually, we buy different types of these mugs to have our daily beverages. A faddish matter is you can make your ceramic mugs. This article provides you with all the essential information to make it easy. If you already know how to make a ceramic mug, this guide will help you with some common mistakes. But if you don’t know, this article will guide you until the end.
Making ceramic mugs is a relatively easy job, as you think. It will be easy if you follow proper guidelines as well. However, you’ll need some supplies to make it at home. Gather all these supplies before you start making it. You’ll be stuck in the middle of crafting if you gather them only once. Anyway, let’s not talk more in the introduction; let’s jump to the point.
How are ceramic mugs made?
Ceramic mugs, we use one every day, but how are they made? First, the raw material is fed into a grinder and pulverized into smaller, more manageable clay powder. The clay powder is combined with quartz, feldspar, and water in a mixer for 15 hours. The refining process continues as the clay slurry is fed into the molding tubes and cast into long clay logs cut into specific portions. The portion play discs are placed into a single-use mold and formed into the shape of your mug. Once dried, the cup is removed from the mold by hand and is ready for the next step.
Handle application. The mug handles have been created similar to the body of the mug. Once they’ve dried and been released from their molds, the handles are dipped in a mixture of clay and water called slip, which acts like glue.
It’s time for some detail. A technician carefully removes any excess clay or rough edges rinses off any dust or debris, and gives the mug the perfect smooth finish. Now it’s time for the mugs to obtain their color and trademark ceramic glaze.
Some mugs are dipped into a single-color glaze, the edges are padded, and they’re ready for the next step. Other mugs require more flair, such as a specially painted grim or a different colored interior and exterior. All the mugs are handed and painted to ensure quality coating every time. The mugs are set aside for at least 12 hours to dry completely before moving on to the oven.
Baking and packaging steps
Now it’s time to bake them which will cause them to harden permanently. Rows and mugs are placed onto a conveyor, carrying them through the oven and out the other side. The standard oven temp is around 2200 degrees Fahrenheit. Great news, your mugs are now finished, and they look great.
The shipping department wraps them in plastic boxes and ships them out to lucky customers worldwide. Some mugs will remain blank, and some will have a logo or text printed, transforming them into branding superstars. So the next time you’re enjoying a cup of coffee, tea, or cocoa, take a minute to glance down and appreciate all the hard work and craftsmanship that went into your favorite mug.
Can I make ceramic mugs at home?
You can make a mug at home using low-fired ceramic clay powder. Combine the clay powder with quartz, feldspar, and water in a mixer, and let it sit for at least 15 hours or overnight. The next day, shape the clay into a mug and let it dry. Once the mug is dry, apply glaze to the inside and outside of the mug, and let the paint dry. Then, the last step is to fire it in an oven at 2200⁰ Fahrenheit temperature.
Can you make ceramic mugs without a kiln?
Yes, of course, you can make mugs without a kiln. Grab some low-fire ceramic clay and grind it properly by squeezing it. Hence, please give it a mug shape and let it dry. After that, swab the mug with a wet sponge as well. Then, glaze the mug with a paintbrush, dip it into the paint, and let it dry. Finally, fire the glazed mug in an oven from 1120 degrees to 1245 degrees F.
How much does it cost to make a ceramic mug?
Making a ceramic mug costs approximately $3.50 for ceramic materials. This cost includes the clay, glaze, and kiln firing. The cost of labor is variable, depending on the artist or company. However, the average cost of labor for a ceramic mug is $6.00. Therefore, the total cost to make a ceramic mug is $9.50.
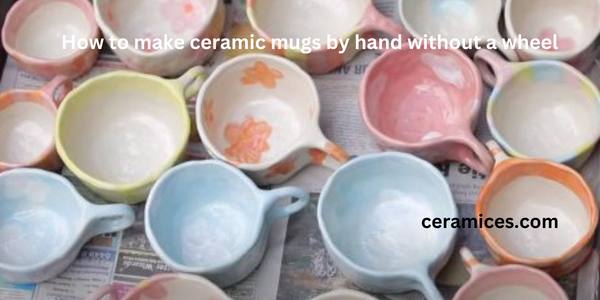
How to make ceramic mugs by hand without a wheel
Let’s say you are wondering about making a mug and want to know how to make a ceramic mug without a wheel. Well, in this guide, we’ll show you the most effortless process. However, we have a list of things and supplies; let’s gather them all. If you have them all, what you’re waiting for? Let’s dive into the steps.
Things you’ll need
- Low-fire clay
- Craft knife or scoring tool
- Slip
- 4″ round cookie cutter
- Rolling pin
- Two wood rulers, flat
- Water
- Cooking cooling rack
- Plastic covering
- Ceramic glaze
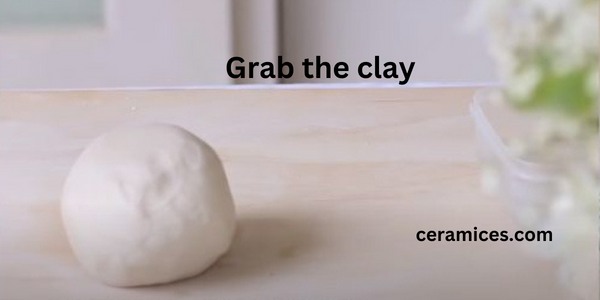
Grab the clay:
First, grab the ceramic clay you want for making one mug, approximately 600g for a large mug and 400g for a small mug. Then, make the clay soft and shape it ball look. Make sure your clay is soft enough and perfect for giving it a mug shape. If the clay is not soft, it may crack while you are firing it. So, making the clay perfect is essential before you move forward to the next step.
Giving a mug shape:
We already have a clay ball for the next step, and we’ll give it a mug shape. We’re using the “pinch pot technique” to open a hole into the clay. Now, pinch the middle of the clay and turn your finger around to open the space.
- Open a hole like a mug. It would be your choice as you want it.
- Round up the bottom to make it flat.
- You want it to be an even width all over.
- Use a bit of water to smooth it if needed.
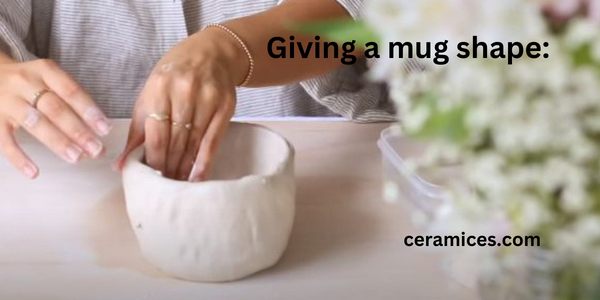
Note: It won’t be perfect just yet. But, try to give it as excellent shape as you can. The more nice shape you can make, it will be as more beautiful the mug.
Dry the mug: Set it for half an hour to cure before attaching the handle to it.
Make a handle:
The mug is curing aside. In the meantime, take some clay, roll it to handle size, and smooth it. Hence, band the handle and trim it to cut off extra size. After that, score on the mug where you want to place the handle. At the same time, score the bottom of the handle and wet them both to cure strongly. Now, place the handle on the pointed place of the mug and push them together. Next, add some extra clay to ensure it’s secure and robust. Finally, smooth everything with water and let it completely dry for a week.

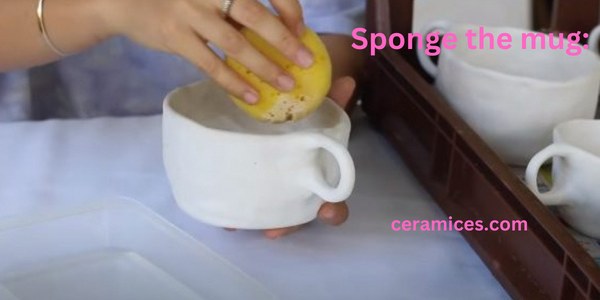
Sponge the mug:
After drying it thoroughly:
- Sponge the mug with a wet rubber sponge.
- Make sure all the clay dust and debris are wholly removed
- Sponge the mug twice or three times to clean it away correctly.
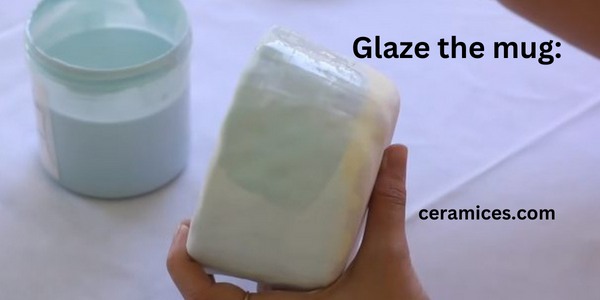
Glaze the mug:
Glaze the mug with a small paintbrush. Paint over the mug as you want, such as flowers, designs, and more. You can use two or three-color glazing to make it attractive. However, glaze inside and outside the mug and let it dry.
Firing the mug:
Lastly, you want to be firing the mug to complete the process. Place the mug into a kiln to fire it. After firing it, the color will be bright. The firing temperature will depend on the type of clay you’re using. Here in our project, we use low-fire ceramic clay, which usally fire between 1162 degrees to 1240 degrees Celsius for 24 hours. Remove the mug after 24 hours and enjoy it.
Note: If you don’t have a kiln, you might use the oven to fire a ceramic mug.
How to make a ceramic mug using a wheel
Making a clay mug is enormous fun. You’ll enjoy it if you know the process from beginning to end. Let’s have fun by making a stoneware clay mug using the wheel. To make a clay mug, first, you need some clay. Then, throw the clay on the wheel and give it a mug shape. Next, smooth and dry it. Hence, glaze it and fire it, then enjoy your beverage. Now, let’s dive into an in-depth explanation guide as well.
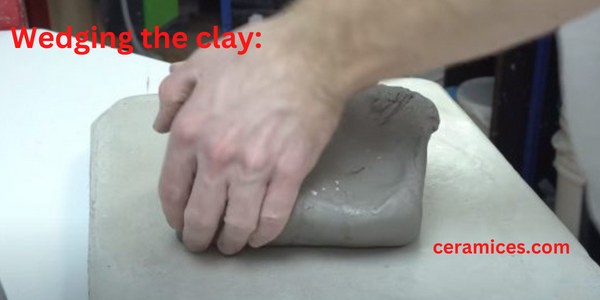
Wedging the clay:
Take some clay and wedging it to smooth out any unevenness in the clay. The more homogenous the clay is, the better it will throw on the wheel. So, it’s worth spending extra time here to properly wedging the clay. Finish the process by wedging in smaller and smaller movements until it forms a cone.
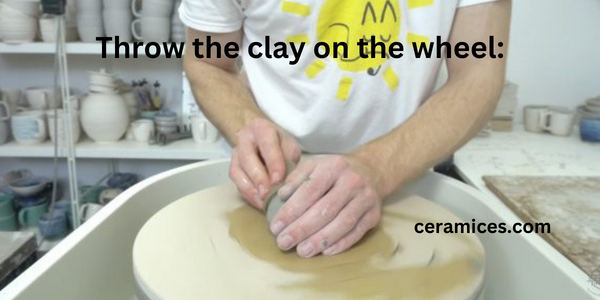
Throw the clay on the wheel:
Now, grab 400g of clay and make it a ball look. Then, throw it on the wheel. Firstly, start by coning the clay up and down. Place your finger center of the clay and continue to even it out. The process started with wedging.
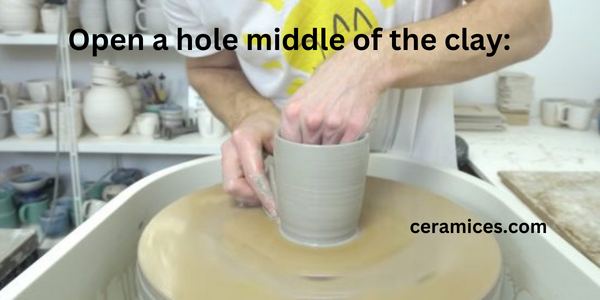
Open a hole middle of the clay:
Once the clay is smooth and wedging, open a hole center of the clay. After that, push down with your thumbs until it goes about 1 centimeter from the batt. Leave enough clay for the base and put the rest in the walls.
Pull the wall up:
In this step, use a sponge in your hand, and start to pull the walls up. Hence, press out your inside and outside hands slightly lower together, and force the clay to move upwards. You want to apply the pressure evenly to all the circumferences as the wheel turns. Remember, if the wheel turns too slowly or the pressure is too great, the wall will not come up evenly. Therefore, you need to match the pressure, wheel speed, and speed of your hand raised. So, you can able to give it a perfect shape. And we’re done making a mug; now dry it up for 30 minutes.
Smooth the mug:
After drying, take it back to the wheel for the first trim. It’s easier to do this step while it is firmly attached to the batts right up. Then, smooth the bottom of the mug. Furthermore, use your inside hand to check the wall thickness and fix it if you notice any desired width and shape. Next, burnish the clay to smooth it again with a firm rib. Then, take out the mug from the wheel.
Making a handle:
Take a small amount of clay and prepare it for making a handle. Load the clay into a clay extruder by using pressure. Then, add a shape handle die and seal the end. Pull the “trigger” to extrude the length of the shaped clay and place it on a plain surface. Oh yeah, if you don’t have it, then roll some clay using your hand. After that, cut off the clay by measuring 105mm. Because it is the comfortable handle size for medium mugs. Lastly, smooth it, band it, and score the bottom of the handle. And then, attach the handle to the mug and let it dry.
Bisque firing:
Once dry, place it into a kiln for bisque fired to 1000 degrees Celsius.
Glazing:
You can use the same variegated pink glaze inside and outside for a simple application:
- Mix the glaze in a bucket with a drill mixer.
- Wipe the mug with a damp sponge to remove any dust.
- Pour the glaze into the mug and leave it for one or two seconds.
- Dip the mug into the glaze and leave it for 5 seconds.
After that, take it out, shake to excess glaze off, and let it dry.
Final firing:
Finally, load the mug into a kiln and fire to approximately 1200c for 24 hours. Place the mug on little coasters of the same clay to catch the glaze. Then, take out after 24 hours and enjoy your coffee mug and celebrate yourself.
Why is ceramic used to make mugs?
Ceramic is a high-temperature clay that is ideal for making mugs. However, the ceramic material is resistant to high heat. As a result, you can brew hot coffee or tea into ceramic mugs without damaging or cracking them. So, ceramic is an ideal and safest material for making mugs. Not only that, this material can make enormous things such as plates, cups, figures, and more. On the other hand, they’re high heat resistance, dishwasher safe, microwave safe, quiet durable, provides original taste, keeps the beverages hot for longer, and more. As a result, it is better to go with ceramic.
How long does it take to make a ceramic mug?
The answer may surprise you if you’re wondering how long it takes to make a ceramic mug. While it varies depending on the size and complexity of the mug, the average time to make a ceramic mug is just under an hour. Of course, this doesn’t include the time it takes to glaze and fire the mug, which can add another day or two to the process.
Firstly, you need to prepare the clay. Then, shape the clay as a mug. After that, it needs to fire in a kiln. Finally, glaze it to give a dramatic new look. It takes quite a bit of time to make a ceramic mug.
FAQs
Certainly! Here are some frequently asked questions (FAQs) related to making ceramic mugs:
What is the process of making a ceramic mug from scratch?
Making a ceramic mug from scratch typically involves several steps: preparing clay, shaping the mug on a pottery wheel or by hand, allowing it to dry, bisque firing, glazing, and a final firing in a kiln. Each step requires specific skills and techniques.
What type of clay is best for making ceramic mugs?
Stoneware clay is a popular choice for making ceramic mugs due to its durability and ability to withstand high temperatures. It provides a good balance between workability and strength. Porcelain clay is also used for its fine texture and elegant finish.
Do I need a pottery wheel to make ceramic mugs, or can I do it by hand?
You can make ceramic mugs both on a pottery wheel and by hand. Pottery wheels provide precision and speed in shaping, while hand-building techniques like coiling, pinching, and slab-building offer creative possibilities for unique mug designs.
How long does it take to make a ceramic mug, from start to finish?
The time required to make a ceramic mug can vary depending on factors like the complexity of the design, the drying and firing times, and the artist’s skill level. On average, it may take several days to weeks to complete a mug, including drying and firing times.
Can I personalize or decorate my ceramic mug?
Yes, you can personalize and decorate ceramic mugs in various ways. This includes adding handles, carving, painting with ceramic glazes, using decals, or even incorporating textures or patterns into the clay during the forming stage.
What are some common mistakes to avoid when making ceramic mugs?
Common mistakes to avoid include not properly wedging the clay, which can lead to air bubbles, uneven thickness, or cracks; improper drying, which can result in warping or cracking; and glaze application issues, such as uneven coverage or incompatible glaze combinations.
Can I make ceramic mugs at home, or do I need access to a pottery studio?
You can make ceramic mugs at home if you have access to the necessary equipment, including a kiln, clay, and tools. Many artists and hobbyists have home studios for pottery. However, if you’re just starting, attending a pottery class or using a community studio can be a good way to learn and access the required facilities.
How do I properly care for and maintain ceramic mugs I’ve made?
To care for your ceramic mugs, avoid exposing them to rapid temperature changes, always hand wash them, and avoid using abrasive scrubbers or dishwashers. With proper care, handmade ceramic mugs can last for many years.
Can I use my ceramic mug for hot and cold beverages?
Yes, ceramic mugs are versatile and suitable for both hot and cold beverages. They can handle the temperature variations without cracking or breaking, making them a popular choice for coffee, tea, and other drinks.
Where can I learn more about making ceramic mugs or pottery in general?
You can learn more about making ceramic mugs and pottery through pottery classes, workshops, online tutorials, and by joining pottery communities. Many experienced potters and artists share their knowledge and techniques to help beginners get started.
These FAQs provide a starting point for those interested in the art of making ceramic mugs. Whether you’re a beginner or an experienced potter, creating ceramic mugs can be a rewarding and creative endeavor.
Conclusion
In conclusion, understanding the process of how to make a ceramic mug offers a glimpse into the artistry and craftsmanship involved in creating functional and aesthetically pleasing pieces. Crafting ceramic mugs from scratch is a multifaceted endeavor that encompasses choosing the right clay, mastering shaping techniques, and skillfully navigating the complexities of firing and glazing.
Whether you opt for the precision of a pottery wheel or the artistic freedom of hand-building, making ceramic mugs allows for creativity and personalization. You can infuse your own style and personality into each piece, adding unique handles, textures, and decorations to make your mugs truly one-of-a-kind.
The journey of crafting ceramic mugs also involves learning from mistakes, understanding clay behavior, and appreciating the nuances of the pottery process. With patience and practice, you can overcome common pitfalls and refine your skills to create beautiful and functional mugs.
Furthermore, the care and maintenance of handmade ceramic mugs are crucial for preserving their longevity and beauty. These mugs are not only functional but also a testament to the artistry and dedication of the maker.
For those interested in pursuing the art of ceramic mug making, there are numerous resources available, from pottery classes to online tutorials and vibrant pottery communities. Whether you’re a seasoned potter or a novice looking to embark on a creative journey, the world of ceramic mug making offers endless opportunities for self-expression and artistic growth.
In embracing the process of making ceramic mugs, one not only gains a functional piece of art but also experiences the joy of creating something truly unique and enduring. Whether for personal use or as cherished gifts, ceramic mugs are a testament to the craftsmanship, creativity, and passion of their makers.