A ceramic bong or a smoke bong is made up of clay that smokers use t display. Having a lot of bongs increase the look of the interior. Bongs made up of ceramic can function like any other bong but behave differently when it comes to smoking. Beautiful and attractive pipes attract people. Does the question arise that how to make a ceramic bong?
We will guide you in the making of ceramic bongs. Follow the steps one by one to get a complete description of their production. Following the guidelines, it becomes easy to make a bong at home.
Material required for making a ceramic bong
The basic material for bong production is the same as people use for making pottery. For the making of the ceramic body, you’ll need:
- Pottery clay
- Non-toxic glaze
- Water (that keeps the clay moist)
There are some tools needed to make a ceramic bong
- A hard and clean table: use for needing
- A rotating wheel: It is needed to give proper shape to clay.
- Plastic scraper or wooden scrapper: It will work for scrapping purposes.
- A furnace, oven, or kiln: Use it to make our clay hard.
- Paintbrush: to decorate the bong
- Torch: firing the clay on the wheel.
How to make a ceramic bong step by step
Here are simple steps are given below to make a bong easily.
Kneading the mud
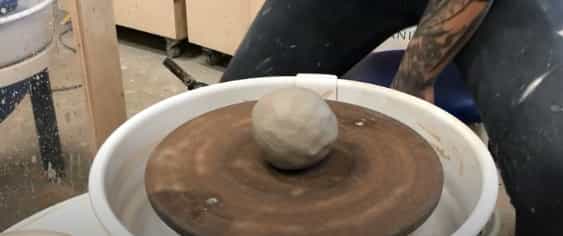
Take a hard surface like a wooden tray or a plastic tray for kneading the mud. Certain precautions are necessary while kneading the mud. Pour enough water into the mud to keep it wet. Less water in mud will make it hard with time, and you cannot perform the process. The bong will not be durable.
Use clay that is 5inches in diameter. Roughly equal to the ball of a volleyball. Keep pouring water from time to time, and don’t let the moisture dry out from the mud. This wet mud is great for making bong. Read more, how to make ceramic decals?
Placing on a rolling wheel
Place the entire mud on the rotating wheel. The condition of mud must be wet when you put it on the wheel. The wheel is constantly rotating. To make the shape of the bong, put your hands in the wet mud while it is rotating. For making shapes, use your fingers only, and don’t use the thumb. Inserting your fingers inside and applying a little pressure inside out will give your desired shape.
Additionally, keep using the water on the inside of the shape to make it wet from time to time. It will give better results. Also read, how to make ceramic beads?
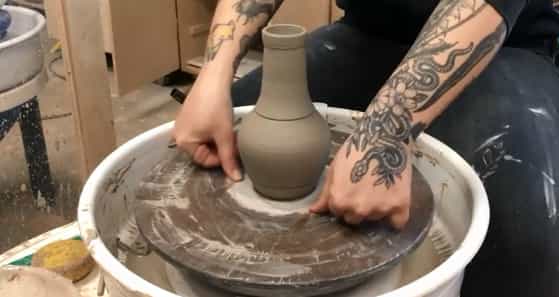
Making the shape-Make a ceramic bong
The next step is to make the opening of our bong, easy yet technical step. The bong has a wide bottom and a narrow opening from the top. So, to make the bottom wide, we inserted fingers and applied a little pressure.
Now, we will make the narrowing of the bong. Stop applying the pressure from fingers from the top. Give a curve shape to your fingers and slowly start taking the fingers off from the bong. It is how you’ll make the narrow head of bong.
Narrowing the opening
One method to make the opening narrow is what we discussed above. Another method is the scraper method. The narrow opening can also be made using the scrapper. Put the fingers inside and start pulling the fingers up, and by using a scraper, you’ll make the narrow opening of the bong. A popular article, how to make a plaster mold for ceramics?
Hardening the mud
The bong isn’t completed yet. It has a lot of moisture, and moisturizing means instability.
Hardening the mud is important but don’t use a kiln or oven at this stage. Don’t harden it permanently here; instead, use tools that will make it a little harder. Many tools are here to make mud hard, but we’ll not use any of them.
Using a torch for hardening is a good option. Torch the mud for a different duration as it depends upon the type of clay. The standard duration for torching the mud is about one minute or less than one minute. Related article, how to make ceramic tiles non-slippery?
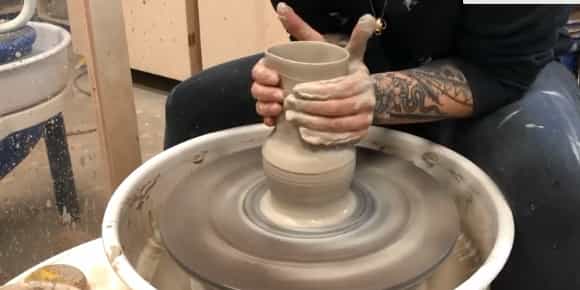
Creating the neck
The crucial step is to make the neck of the ceramic bong. The easy way to make a neck is by bending the scrapper inward. Keep pulling the scrapper as high as you want to have the neck of your bong. May you like, repair hairline cracks in the ceramic floor tile.
Making the mouthpiece, Make ceramic bongs
Making of mouth is an easy step; you can do it with basic knowledge. You have made a ring-like structure at the end of the neck. It needs flaring as a final touch-up. Start flaring from the top, and it will be your mouthpiece. You may like, how to repair ceramic tiles?
Separating the bong from the wheel
Separation of the wheel from the hard surface is the next step you do. Use a wire or string for this purpose. Piece if the string will separate the bong from the surface. Don’t proceed further until it gets dry first. Our related content, how to print on ceramic mugs at home?
Shaping of bowl
Make another tall cone using the mud. Again, make a shape from the top and use a string for separation.
Creating a tunnel
Perform the same step with the downstream. Use a metal rod or a long iron stick to insert and make a tunnel. The tunnel needs holes from the sides. Make holes from the sides that act as a diffuser for the pipe. The length of the tunnel is very important. Be sure about the length that it reaches in the bottom water. Info article, how to clean ceramic nails?
Finishing the ceramic bong, the Last step to make a ceramic bong
1) Finishing requires a little effort and technique. Start the finishing process by cutting a hole in the body of the pipe. Try inserting the downstream from a certain angle. Use coiling to seal the connection thoroughly.
Drilling a hole
A hole is needed that connects the bowl to the downstream.
Firing
When all the process is completed, firing is done. Put newly made ceramic bong in a kiln or furnace, or oven. Don’t put the ceramic bong directly into a superheated oven or kiln. Put the bong in a kiln and start heating it smoothly and gradually.
Cooling down the kiln
Cooldown the kiln before taking out the product. Let it cool to room temperature, and try to wear gloves all the time. Wearing the protective material will be very helpful. Now take out the bisque from the kiln while wearing the gloves.
Best way to make ceramic bong
In the world of smoking paraphernalia, ceramic bongs are not only functional but also an artistic expression of creativity. Crafting your very own ceramic bong can be a rewarding and unique experience, allowing you to customize it to your liking. In this step-by-step guide, we’ll walk you through the process of creating a ceramic bong that’s not only functional but also a piece of art.
Materials You’ll Need:
Before you dive into making your ceramic bong, gather the following materials:
- Clay: Choose a high-quality clay suitable for ceramics. Stoneware clay is a popular choice.
- Pottery Tools: Clay cutting tools, rolling pins, and a smoothing sponge are essential.
- Kiln: Access to a kiln is crucial for firing your ceramic bong.
- Glazes: Ceramic glazes of your choice for adding color and finish.
- Bong Components: You’ll need a downstem and bowl, which you can purchase separately.
Step 1: Design Your Bong:
Before you start crafting, sketch your bong’s design on paper. Consider the shape, size, and any decorative elements you want to include.
Step 2: Prepare the Clay:
- Knead the clay to remove air bubbles.
- Roll out a slab of clay using a rolling pin to your desired thickness.
- Cut out the base and walls of your bong using pottery tools. Remember to leave an opening for the downstem.
Step 3: Assemble Your Bong:
- Attach the walls to the base using slip (a mixture of clay and water). Smooth the joints with a smoothing sponge.
- Add decorative elements like textures, patterns, or sculpted designs if desired.
- Allow your bong to dry slowly to prevent cracking. This can take several days.
Step 4: First Firing (Bisque Firing):
- Place your dried bong in a kiln and fire it to a temperature suitable for bisque firing (typically around 1800°F or 980°C). This firing removes all remaining moisture from the clay and strengthens it.
- Let your bong cool completely before removing it from the kiln.
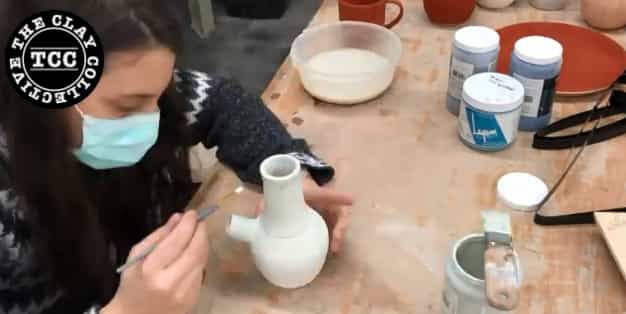
Step 5: Glazing:
- Apply your chosen ceramic glazes to the bisque-fired bong using a brush or dipping method.
- Allow the glaze to dry before placing it back in the kiln.
Step 6: Second Firing (Glaze Firing):
- Fire your glazed bong in the kiln to the recommended temperature for your glazes. This temperature varies depending on the glaze you use.
- Once the firing is complete, let your ceramic bong cool down before handling it.
Step 7: Assemble Bong Components:
- Insert the downstem into the designated opening you left earlier.
- Place the bowl on top of the downstem.
Step 8: Final Touches:
- Check for any sharp edges or imperfections and smooth them out.
- Clean your bong thoroughly to remove any remaining glaze or clay residue.
FAQs
Certainly! Here are some frequently asked questions (FAQs) about making a ceramic bong:
What type of clay should I use for making a ceramic bong?
Stoneware clay is a popular choice for making ceramic bongs because of its durability and suitability for high-temperature firing. It can withstand the heat produced during smoking.
Do I need a kiln to make a ceramic bong?
Yes, you’ll need access to a kiln for firing your ceramic bong. The kiln is essential for both bisque firing and glaze firing to give your bong its strength and finish.
How long does it take to make a ceramic bong from start to finish?
The entire process can take several weeks, including designing, drying, bisque firing, glazing, and glaze firing. The exact time can vary depending on factors like the complexity of your design and drying conditions.
Can I customize the design of my ceramic bong?
Absolutely! One of the advantages of making your own ceramic bong is the ability to customize it to your liking. You can create unique shapes, add textures, and choose from a variety of glaze colors to make it your own.
Is it safe to smoke from a homemade ceramic bong?
When made correctly and fired at the appropriate temperatures, ceramic bongs are safe for smoking. However, it’s crucial to ensure that the glazes used are food-safe and don’t contain any harmful chemicals. Always clean your bong thoroughly before use.
Can I repair a cracked or broken ceramic bong?
Small cracks may be repairable with ceramic adhesive or clay slip before glazing and firing. However, significant cracks or breaks may compromise the bong’s structural integrity and safety, and it’s best to discard it.
Are there any safety precautions I should follow when using a ceramic bong?
Yes, safety is paramount. Always use your ceramic bong responsibly and avoid excessive heat exposure, which can cause cracking. Also, ensure that you clean it regularly to prevent the buildup of resin or residue.
Can I make a ceramic bong without any prior pottery experience?
While prior pottery experience can be helpful, it’s not necessary. You can learn the basics of working with clay and ceramics through online tutorials or classes. Start with simple projects to build your skills before attempting a ceramic bong.
Can I sell or give away ceramic bongs that I make?
Selling or giving away homemade ceramic bongs may be subject to legal restrictions depending on your location. Be sure to research and understand the laws and regulations regarding the sale and distribution of smoking accessories in your area.
Can I make a ceramic bong without access to a kiln?
Unfortunately, a kiln is essential for firing ceramic bongs. Without access to one, it’s not possible to complete the firing process, which is crucial for creating a functional and safe ceramic bong.
Conclusion
In final thoughts, the journey of creating a ceramic bong is a captivating blend of artistry, craftsmanship, and functionality. This process offers a unique opportunity for self-expression, allowing you to fashion a smoking accessory that not only serves its purpose but also reflects your individuality and creativity.
From the initial design sketches to the careful selection of materials, each step in making a ceramic bong is a chance to infuse your personality into this functional piece of art. Patience and attention to detail are key, as the process requires time and precision to yield a beautifully crafted bong that stands as both an artwork and a tool for enjoying your favorite herbs.
Safety should always be paramount, from the choice of food-safe glazes to responsible usage and maintenance. By following safety guidelines and local regulations, you ensure a satisfying and secure smoking experience.