We’re using ceramic tile everywhere in bedrooms, drawing rooms, kitchen rooms, bathrooms, and outdoor. Sometimes the ceramic tile floor gets more slippery and gets an accident. Kid’s, elders, and even young people can fall accidentally because of tile slippery. In this context, we’re going to show you how to make ceramic tiles non-slippery.
Do you want to make your ceramic tile floor non-slippery? And you don’t know how to make tile floor non-slippery? Here we bring for you some non-slippery solutions. You can apply it to your ceramic tile to prevent slippery as well. Again, you’ll learn here how to make tile non-slip step by step.
How to make ceramic tiles non-slippery using Anti-slip treatment
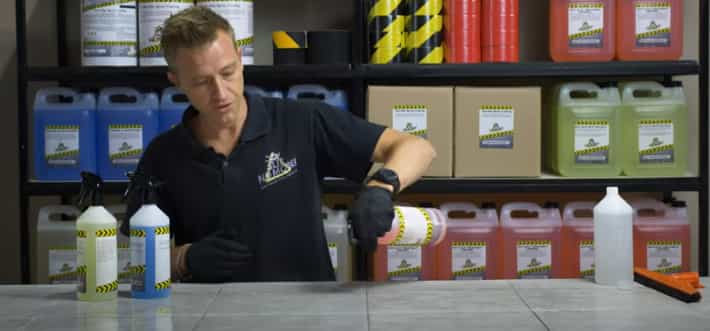
How’s it, guys? I’m from slip no more. Today we’re going to talk about our ceramic tile treatments. So this is a treatment that you use on your ceramic tile floors, which have not been sealed.
So what it does, it gives you an invisible thread on the actual thoughts surface. And it will take away your risk of slipping on the areas that have been treated. It will last you up to three years.
Okay, so for the actual application of the product, what I’m going to do is I’m just going to take a five-liter, and I’m going to pour it out into the smaller container just for instruction purposes.
Okay, so I’ve also got my cleaner and my neutralizer in smaller containers for the application. Then very important, always wear gloves when you handle any treatments or anything like that. Okay, guys, so it’s a three-step process. Read more, ceramic tile cutter.
Step one Take your anti- cleaner
Apply the cleaner to the surface that you’re going to do a treatment on. So for the content, I’m doing two towels for the sealant. So what I’m doing is I’m going to use a cloth, to give them the floor wash the towels. So if you are going to do a more extensive area, you’re going to use a mop that you will use.
Okay, so now wash the floor. Take a bit of clean water to rinse off your excess soaps that might be left behind. Would you please make sure the sealer is dry before you apply the actual treatment? Check here how to cut ceramic tile.
Step two Put the actual treatment
So you take the cleaner, spray it onto the towel—a reasonable amount, and make sure that you cover the area you want to spray. A good thing to keep in mind is not to spray too far, where you can’t see how much product you’ve applied.
So if you’re doing tiles, for instance, in an area, make sure you do 2 to 3 rows of tiles where you can cover it equally on the ceramic tiles. You have to leave it on for clay ceramics is 3 minutes to 8 minutes that you leave it on. Also read, how to remove ceramic tile.
Remember: It’s essential to test on a small area before doing a more extensive area. So you can get the perfect feel that you want to accomplish. Also, while you apply the product, you will see that in certain areas.
It will start drying. You’ll have to keep applying the treatment to those areas to make sure that it’s covered perfectly. Okay, so our time is done with the actual treatment has been on the towels.
Step three is a neutralizer
Take the neutralizer, apply it to the actual surface that you applied your towel treatment on. Then leave it for 2 minutes on to the treatment itself. Also, keeping it wet. After that, you can just like clean water and wash it off. Related content, drill bit for ceramic tile.
The last step clean the floor as well
In this step, take some normal clean water, pour on onto the surface that you treated. Take your mop, clean the floor as well. Take off most of the water as you can. And take a squeegee, squeegee off any excess water that you’ve got. Then you can feel the difference between a treated tile and other tiles. Thank you, guys.
How to make ceramic tile non-slippery using DGA Anti-slip coating
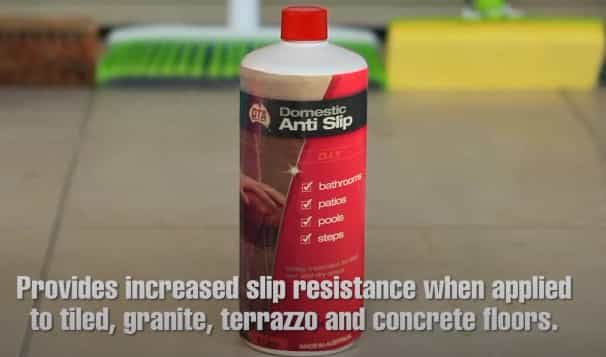
DGA anti-slip is a safe treatment for hardcore surfaces. It’s a liquid Chemical Safety treatment that increases slip resistance when applied to tiled granite terrazzo and concrete floors. It is not suitable for porcelain tiles. It produces little or no change in appearance.
When applied to glazed or polished surfaces, One liter of anti-slip should cover 10 square meters in up to three applications. It is roughly one-third of a liter per application. Anti-slip must be applied correctly. This content will show you how to get the best results. Popular content, ceramic tile paint.
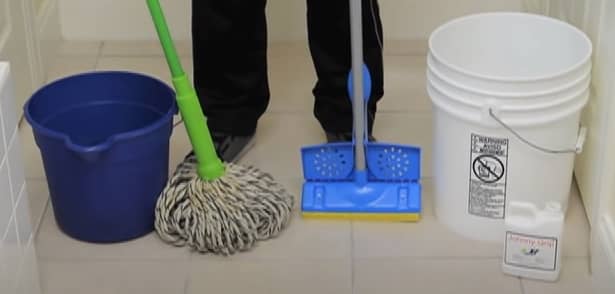
Gather some stuff to start your job
- Mop
- Bucket
- A soft bristle broom
- Stiff bristle decking brush
- Rubber gloves
First, you’ll need the right tools for the job, mop, bucket, a soft bristle broom or stiff bristle decking brush or a sponge or rectangular bucket, and rubber gloves.
Tape off any area that not to be treated
First, tape off any areas not to be treated. Use plastic and masking tape. It will protect the other surfaces near where you’re working.
Clean the selected area with a mop
Step two, clean the area to be treated, ensuring it’s free from dirt and grease. It should be done with a regular floor detergent. Once the floor has been thoroughly cleaned and rinsed with clean water, pour the anti-slip formula into a bucket. Never pour anti-slip directly onto the surface to be treated.
Step three. You must test anti-slip on a small inconspicuous area to determine the number of treatments required. Here we choose a small group of tiles in the corner. Ensure you always apply anti-slip to a wet surface.
Use a mop again with clean water if the surface has dried. The application of anti-slip is applied in a north-south east-west motion to get 100% coverage of the test area.
Between test coats
Use your fingers to test the area to determine the number of applications you need for desired results after deciding what number of applications are required. Thoroughly rinse and dry the test area before proceeding to the remainder of the application to ensure you’re happy with the result and the finish of the tiles.
Clean the treated area
Step Four. Start by cleaning a larger area. This next area should be no more than five square meters. one liter of anti-slip should cover up to 10 square meters in up to three applications. It is roughly one-third of a liter per application after cleaning the area with a floor detergent.
Ensure the area is 100% wet with clean water. Immediately apply anti-slip over the wet surface using a brush natural bristle broom or sponge squeegee. Necessary not to allow the surface to dry at any stage during the application.
Do not apply for anti-slip protection on dry surfaces
Remember: The anti-slip should never be applied to a dry surface. If the surface has dried, remove the area to ensure that the surface is damp. Always apply the anti-slip product in a north-south east-west motion to ensure 100% coverage.
Apply your next coat within five minutes. So the anti-slip product does not dry. This time may vary depending on different climates or air conditioning. And if the surface has dried wet by mopping the dry area with clean water, reapply your anti-slip coat.
Wash the area and wait for dry
Step Five. Once finished, wash the area down with clean water and a mop. Change the water in the bucket regularly to ensure clean water is used when washing the area down—finished by using a floor detergent and mop or vacuum dry. Anti-slip is odorless and can be used as soon as the area where the product was applied has dried.
Make ceramic tile non-slippery by applying Jhonny grip
Hey, I’m with Johnny’s grip, non-slip floor products, and slippery tile calm. I will show you how to apply Johnny’s grip to a tile floor from start to finish. I’ve already done a test area on the tile previously, and I know that it takes 13 minutes to treat it.
These are the tools you’ll need
Now, you’ll probably already have a reg mop and a bucket like the one you see here. It is just for applying the water. But what you’ll also need is an empty five-gallon bucket and a sponge mop like this one.
- Reg mop
- Bucket
- An empty 5-gallon bucket
- A sponge mop
Why we chose this sponge mop?
(Mop pictures and amazon link)
Now, the reason why I like this sponge mop is that it’s got a wide surface area, and it’s great for scrubbing. Also, this mop has no metal on it. So there’s nothing that can rust. And at the end, we can wring it out, and we can reuse it. Read here how to clean ceramic tile.
Now I got this sponge mop from Amazon, and it’s $5. It is the one that I would suggest that you purchase to do this product, you also want to put a towel down on the edge of your area, so you have someplace to set your equipment. Now there are tiles over here that lead to the bathroom area. And I do not want to treat those right now.
We can’t treat half of a tile because there’s a good chance you’ll see the difference. So what we’re going to do is go ahead and stop right here at that grout line. That way, we make sure that we treat it appropriately.
Start to make ceramic tile non-slippery with Jhonny’s grip
The first thing we’ll do is we’ll pour the product into the bucket. We’ll go ahead and start applying the product. We’re just going to mop it on just like you’d regularly mop the floor.
Okay, and we’re going to go right to the edge of that grout line, just like we had talked about earlier.
Wait for five minutes
If you have a larger area, you’re want to walk in it just like I’m doing now. And you want to make sure that you get the entire area covered. Okay, now we wait five minutes.
Mop the floor with this solution
What we’re going to want to do is run the mop back over the top of the tiles. You don’t have to apply any new product to it. But what you’re doing is just running the mop over top of them. Drag the product back on top of the tile.
What will happen is the product will run down off the sides of the tile into the grout lines. So you’re scrubbing it and smearing it around to ensure that the tile stays covered the entire time.
Let the solution sit for five minutes
Okay, now we wait five more minutes. All right, now we’re on our last stretch of five minutes. We’ve been a total of 10 minutes. So once again, run the mop over top of the tiles to smear the product around. Make sure it all stays wet.
Apply some freshwater
So now what we’re going to do is go ahead and apply some freshwater. It is going to dilute the product and just by applying a generous amount to it. There’s no reason to have a lake back, but a decent amount about three times the amount of initially applied product.
Dry the floor
All right, now we’ll go ahead and dry it off. Rinse the floor out. Soak the water back up. Just mop it till it’s dry if you have any questions about Johnny’s grip or any other non-slip flooring questions in general.
How to make slippery tiles safe with Watco
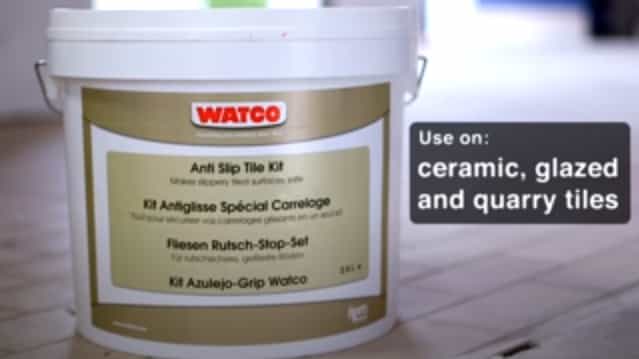
Ceramic tile floors are hardwearing and easy to clean. However, tiles can become very slippery and potentially hazardous. Watco’s anti-slip target is a unique solution that provides a clear, hardwearing, attractive, anti-slip finish.
To get started you’ll need these
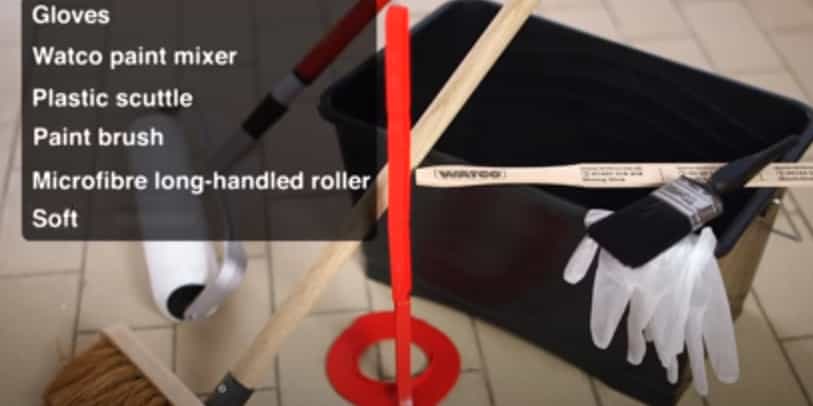
- Glove
- Watco coat paint mixer
- Plastic scuttle
- Paintbrush
- The microfiber long handle roller
- A soft brew.
Clean the tile as well by moping
Remove all contents from the outer container. Watco anti-slip target coating comprises three parts. The resin, activator, and anti-slip aggregate plus a floor cleaner, IPA, degreasing wipes.
Before mixing tiled area should be cleaned with the tongue cleaner and thoroughly washed off with clean water. Once reasonably dry. To ensure proper adhesion of the anti-slip tile coating should be wiped over with the decreasing wipes.
Open the solution and stir it
Open the tin of resin. Also, open the tip of the activator. Stir the contents of each thoroughly. Decant both tins into the tool output and stir to blend. Then add the aggregate and mix thoroughly for two to three minutes until an even consistency is achieved. For the mix coating into the plastic scuttle and use immediately.
Apply it with a paintbrush and roller
Begin by painting the edges and corners with the brush. Then apply quickly and evenly over the whole area using the microfiber roller. The Watco coating can be applied between temperatures of -10 degrees C and 30 degrees C. Based on the latest Polyaspartic raising technology. The coating dries quickly to a hardwearing finish.
Conclusion
Watco Coat anti-slip towel kit is equally effective on porous and non-porous tiles. It provides UV protection against discoloration—and excellent chemical resistance.
The attractive clear finish will take heavy wear, tear and can be steam cleaned. Watco anti-slip targets the hardwearing anti-slip solution for tiled floors. Order your Watco solution today. We hope how to make ceramic tiles with non-slippery content is helpful for you.
What if you want to do the the whole house . It’s white tile but when I clean it just gets slippery and it always feels wet . Would that work