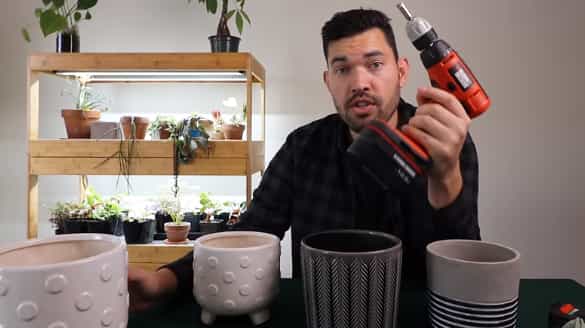
Hey, I’m William Jon, today I’m going to show you how to drill a hole in ceramic pot. So, you have completed your pottery work and now looking to drill a hole through the pot. You have done something easy, and now you are going to deal with something even hard. We make holes in the ceramic pots for many purposes.
Gardening pots add versatility to the garden, It imparts a beautiful look. Colored pots are been used to make the gardens look beautiful for years. It is a way to add instant color by placing them outside your home or placing them on your lawn.
We use ceramic plant pots for flowers, vegetables, and green plants. It is good fun to choose the ceramic pots.
Why do we drill through ceramic pots?
Drilling holes through ceramic pots serves a crucial purpose in gardening and plant care. Here are the primary reasons why we drill through ceramic pots:
- Improved Drainage: Proper drainage is essential for plant health. When excess water cannot escape from the pot, it can lead to waterlogged soil, root rot, and other moisture-related issues. Drilling holes allows excess water to flow out, preventing these problems.
- Preventing Overwatering: With drainage holes, it’s easier to avoid overwatering your plants. Excess water can escape, reducing the risk of drowning the roots and ensuring that your plants receive the right amount of moisture.
- Root Health: Well-draining pots promote healthy root systems. Adequate drainage ensures that roots have access to oxygen, preventing them from suffocating due to waterlogged soil.
- Customizing Soil Mixes: Drilling holes allows you to create customized soil mixes tailored to the needs of specific plants. Some plants, like succulents, require fast-draining soil to thrive.
- Adaptability: Drilled pots are versatile and can be used for a wide range of plants, both indoor and outdoor. You can adjust the number and size of holes to suit different plant varieties.
- Reduced Maintenance: Properly drained pots require less maintenance. You can water your plants without worrying about stagnant water at the bottom of the pot, making caring for your plants more convenient.
In summary, drilling holes through ceramic pots is a fundamental practice in gardening to promote healthy plant growth, prevent overwatering, and customize growing conditions for different plant species. It’s an essential step in ensuring the well-being of your potted plants. Read more, how thick is ceramic tile?
How to drill a hole in the pot?
You can drill a hole in a pot by following the steps. Here are few things that are going to need.
Genarale method
- Tile and glass drill bit
- Power drill
- Safety goggles or sunglasses
Step by step process to make a hole in the ceramic pit.
Ceramic container
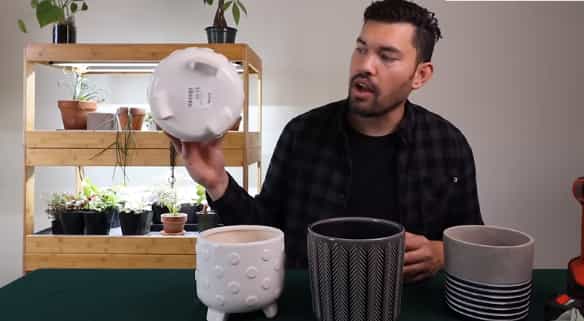
Firstly, you should find a suitable place to perform all work. Select a hard and clean surface. If you are going to do work in bulk, then it is good to make some hard place using cement. You can make a deck for this purpose. Next, place your flowerpot or ceramic part upside down. Do remember all the safety precautions. Don’t forget to put a piece of paper under the ceramic pot. It is to protect the hard surface.
You have already decided where to make a hole in a ceramic pot. In the case of a flower pot, usually, a single hole at the center is enough. If it is a large pot, you can create more than one hole. If you are going to make holes for ornamental purposes, you can make holes from the sides of the ceramic pot.!!!! Also read, how to seal ceramic tile?
Attaching the bit to drill
The next step is attaching the bit to the drill. The type of pi depends upon the kind of pot you are using. The bit and the size of the ceramic pot should have compatibility. It depends upon whether the ceramic part is made up of metal, plastic, or glazed. For metal or plastic pots, we generally use the pit.
In the case we are dealing with unglazed ceramics, we need a masonry bit. While handling with glazed ceramic, we are going to need a glass bit. So, the type of bit is carefully selected, depending upon the type of pot we are using.
A good drill is mandatory. So, it is going to need good power to run. You can use an electric drill. You can also use a battery drill. In case you are using the battery-powered drill, don’t forget to charge it well before using it. Let us precede the experiment. In case I am drilling a glazed ceramic pot, I will use a 3/8’’ tile. For this, I will use a glass bit, which is battery powered.
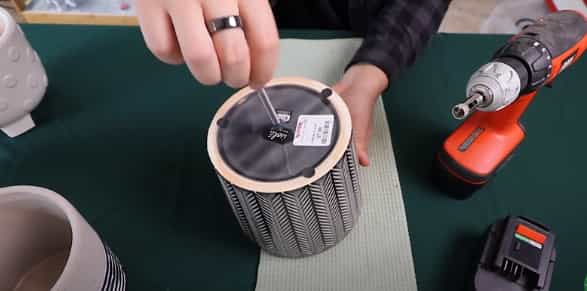
Measurement the ceramic pot
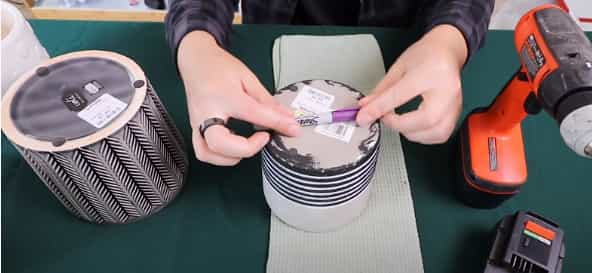
When you start drilling over the pot, you may find it uneasy using the drill machine steadily. You will need to grip around the ceramic glaze. One should care that the drill machine is working. To handle this situation, you can use masking tape over the surface.
Make a clean mark (X) on the area where you want to drill. It will help the surface, help as a grip when you start the drill. You can take help from the grill guide as well. If you are going to create many holes, you can use wood as a template. If you don’t have the masking tape or even water to mark the exact point, you can use a marker as well. Popular content, ceramic tile floor cleaner.
Cool the bits:
It is a key point towards errorless drilling. The drills should be cool while drilling. The cooling doesn’t mean that you are going to need ice cubes for that purpose. No, you just need to keep them a little cool by dipping in water from time to time. Don does not use them continuously. For even better results, you can use a sponge to cool it down.
Using a wet sponge is a good idea because it performs two functions. Firstly, it will keep the bits cool, as it is just beneath the drills. The second one will automatically absorb all the debris and just from the hole and will prevent it from falling back into the hole. Related context, How To Cut Ceramic Tile.
Drilling in ceramic pot

It is the actual drilling process. You can do it yourself, or you can hire a person for this purpose. Hiring a professional person will reduce the risk of cracking the pot. Doing yourself may cause it to break or crack. But, if you do everything carefully, nothing fatal is going to happen. Put on safety goggles before you start the process.
Don’t forget to put on safety goggles because they save you from pieces of ceramic coating. Some people recommend using water for drilling. If you are a drilling expert, both conditions are unnecessary for you. Feel free and do your duty.
Here steps you need to follow while drilling
To begin the drill, place the bit if drill perpendicular to the pot surface. The bit should hand exactly above the base, you want to make a hole.
- While holding the drill in one hand, apply pressure on the pot surface.
- Keep applying pressures until the bit starts making a hole in the pot base?
- Then, decline the pressure and increase the drilling speed.
- Keep drilling until the bit makes a complete hole in the ceramic pot.
- Once the pot is drilled completely, pull the bit of drill out of the hole carefully.
- Repeat the process if you want to drill another hole.
- Clean the pot and wipe out all the dust from the ceramic pot.
- Then clean the pot with water.
Another important tip is that you should be patient while drilling. The duration of drilling depends upon the thickness of the bottom part of the pot. It can take from few seconds to several minutes
Professional Method of Drilling Ceramic Pot: Ensuring Precision and Safety
Drilling holes in ceramic pots is a fundamental skill for gardeners, DIY enthusiasts, and professionals alike. Whether it’s for drainage, irrigation, or creative projects, mastering the art of drilling ceramic pots requires precision and safety.
In this guide, we will explore the professional method of drilling ceramic pots, emphasizing the use of specialized tools and techniques. From selecting the right drill bit to safeguarding against cracks and breakages, we’ll provide step-by-step instructions and expert tips to ensure your drilling endeavors are efficient, clean, and hazard-free. Unlock the potential of your ceramic pots with this comprehensive professional approach.
List of Essential Tools Required for Drilling Ceramic Pots:
- Cordless Drill: A drill with adjustable speed settings is recommended.
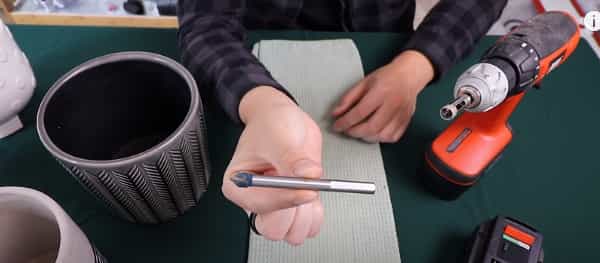
- Diamond-Tipped Drill Bit: Specifically designed for ceramics, these drill bits are essential for effective and clean drilling.
- Masking Tape or Painter’s Tape: Used for marking and protecting the drilling spot.
- Pencil or Marker: For marking the exact drilling point on the ceramic pot.
- Safety Glasses or Goggles: Protect your eyes from flying debris during the drilling process.
- Dust Mask: Prevent inhaling ceramic dust and particles.
- Work Gloves: Protect your hands from sharp edges and the heat generated during drilling.
- Water Source: A spray bottle or container of water is needed to keep the drill bit and ceramic cool and lubricated.
- Sponge or Cloth: Used to wipe excess water and debris from the pot during drilling.
- Bucket or Container for Water Immersion: This is an alternative to a spray bottle for continuous water cooling.
Overview of the Necessary Safety Equipment:
- Safety Glasses or Goggles: Protect your eyes from any debris that may be generated while drilling.
- Dust Mask: Prevent inhaling ceramic dust, which can be harmful to your respiratory system.
- Work Gloves: Guard your hands against potential cuts or burns from hot ceramic fragments.
By using these essential tools and safety equipment, you can safely and effectively drill holes in ceramic pots for various gardening and DIY projects.
Preparing the Pot for Drilling
Before drilling a hole in your ceramic pot, it’s crucial to prepare the pot properly to ensure a successful and clean drilling process. This phase involves:
A. Selecting the Appropriate Spot for Drilling Based on Plant Needs:
- Consider the specific plant you’ll be potting and its drainage requirements. Different plants have varying needs for water retention, so the location of the hole matters.
- Choose a spot on the pot where the drainage hole won’t interfere with the stability of the plant or the aesthetic appeal of the pot.
- Keep in mind that drilling too close to the pot’s edge can increase the risk of cracking.
B. Cleaning and Ensuring the Pot is Dry Before Drilling:
- Start by cleaning the ceramic pot to remove any dirt, debris, or residue. Use a mild detergent and a sponge or cloth to clean the surface.
- Rinse the pot thoroughly with clean water to remove any soap or cleaning agents.
- Allow the pot to air dry completely before proceeding with the drilling process. Moisture can affect the effectiveness of the drill bit and increase the risk of cracking.
Properly preparing the pot ensures that you create a drainage hole in the right location and minimizes the chances of damaging the ceramic during drilling.
Choosing the Right Drill Bit
Selecting the correct drill bit is a critical step when drilling a hole in a ceramic pot. It can make the difference between a successful, clean hole and a cracked or damaged pot. Here’s what you need to know:
A. Different Types of Drill Bits Suitable for Ceramics:
- Masonry Bits: These are designed for drilling into hard materials like concrete and ceramics. While they can work for ceramic pots, they may not be as effective or durable as specialized ceramic bits.
- Carbide-Tipped Bits: These bits have a carbide tip for added hardness and durability. They can be used for drilling ceramics, but they may still require more effort and may not be as precise as diamond-tipped bits.
- Diamond-Tipped Bits: Diamond-tipped bits are specifically designed for drilling ceramics and other hard materials. They are the best choice for this task due to their precision and effectiveness.
B. Importance of Using a Diamond-Tipped Drill Bit:
Using a diamond-tipped drill bit is crucial when drilling ceramic pots for several reasons:
- Precision: Diamond bits create clean, precise holes with minimal chipping or cracking, ensuring your pot remains intact.
- Durability: Diamond-tipped bits are long-lasting and can handle multiple drilling tasks without losing their effectiveness.
- Efficiency: They require less effort and generate less heat compared to other bits, reducing the risk of damaging the pot or the bit itself.
In summary, a diamond-tipped drill bit is the ideal choice for drilling ceramic pots due to its precision, durability, and efficiency, ensuring a successful drilling process.
Marking the Spot
Before drilling a hole in your ceramic pot, precise marking is crucial to ensure the hole is in the right location and properly centered. Here are the best techniques and tips:
A. Best Techniques for Marking the Drilling Spot on Ceramic Pots:
- Painter’s Tape Method: Place a piece of painter’s tape or masking tape on the spot where you want to drill the hole. Use a pencil or marker to mark the exact center of the hole on the tape. This technique provides a clear and removable guide for drilling.
- Template Method: Create a paper template with a hole drawn in the desired location and size. Tape the template to the pot, aligning the hole with your drilling spot. Mark the center through the template onto the pot.
B. Tips for Centering the Hole Properly:
- Measure Twice: Double-check your measurements and alignment before marking or drilling. Ensure that the spot is centered both horizontally and vertically to avoid any deviations.
- Start Small: Begin with a small pilot hole (1/8 inch or less) using the diamond-tipped drill bit. This pilot hole will act as a guide for the larger hole and help maintain precision.
- Use a Level: If you want the hole perfectly level, consider using a small bubble level to ensure the pot is positioned correctly before marking.
- Patience is Key: Take your time when marking and double-check your alignment. Precision at this stage is essential for a clean and centered hole.
By following these techniques and tips for marking the spot, you can ensure that your drilling process is accurate and that the hole is properly centered on your ceramic pot.
Drilling Process
Once you’ve prepared your ceramic pot and marked the drilling spot, it’s time to proceed with the drilling process. Follow these step-by-step instructions and tips for a successful and safe drilling experience:
Step-by-Step Instructions for Drilling the Hole in a Ceramic Pot:
- Safety First: Put on your safety glasses or goggles, a dust mask, and work gloves to protect yourself during the drilling process.
- Secure the Pot: Place the ceramic pot on a stable surface. You may want to put a piece of scrap wood underneath the pot to prevent any damage to the surface below.
- Attach the Diamond-Tipped Bit: Insert the diamond-tipped drill bit into your cordless drill. Ensure it’s securely fastened.
- Position the Drill: Align the drill bit with the marked spot on the pot, positioning it at a slight angle (around 30 degrees) to the surface.
- Start Drilling: Begin drilling at a low speed to create a pilot hole. Apply gentle and steady pressure to prevent the drill from slipping or jumping.
- Add Water Lubrication: As you drill, have a spray bottle or container of water handy. Continuously spray a small amount of water onto the drilling area to keep it cool and lubricated. This prevents overheating and reduces the risk of cracking.
- Gradually Increase Speed: Once the pilot hole is established, gradually increase the drill speed while maintaining steady pressure. Continue to apply water as needed to keep the bit and ceramic cool.
- Monitor Progress: Be patient and attentive. You’ll feel the drill bit breaking through the ceramic. At this point, reduce pressure to avoid any sudden breakthrough that may cause damage.
- Complete the Hole: Once the hole is drilled completely through the pot, slowly withdraw the drill bit while it’s still spinning to minimize chipping at the exit point.
Tips on Maintaining a Steady Pressure and Drilling at the Right Speed:
- Avoid excessive pressure, as it can lead to overheating and cracking. Let the drill bit do the work.
- Maintain a consistent speed to ensure a smooth and even hole.
- If you notice the bit starting to wander off-center, stop drilling, reposition, and continue with caution.
- Keep the drill bit and ceramic surface wet with water to prevent overheating and ensure a cleaner cut.
By following these step-by-step instructions and tips, you can drill a hole in a ceramic pot with precision and safety, allowing you to customize your pots for various gardening and decorative purposes.
Preventing Cracks and Breakages
Drilling a hole in a ceramic pot requires care and precision to prevent cracks and breakages. Here are techniques and tips to ensure a successful drilling process while safeguarding your ceramic pot:
Techniques for Preventing Cracks and Breakages During Drilling:
- Use the Right Drill Bit: Ensure you’re using a diamond-tipped drill bit designed for ceramics. Other types of bits may not be as effective and can increase the risk of damage.
- Start with a Pilot Hole: Begin drilling with a small pilot hole (1/8 inch or less) before gradually increasing the size. This helps maintain control and prevents sudden fractures.
- Keep the Ceramic Cool: Continuous lubrication is essential. Spray or apply water to the drilling area as you work to keep the ceramic and drill bit cool. Overheating can weaken the pot and lead to cracks.
- Maintain Steady Pressure: Apply steady and even pressure on the drill, but avoid excessive force. Let the drill bit and its sharpness do the work. Too much pressure can cause the ceramic to crack.
- Monitor Progress: Pay close attention as you drill. You will feel the drill bit breaking through the ceramic. When this happens, reduce pressure and proceed carefully to avoid any sudden cracks.
- Slow and Steady: Drill at a controlled speed. Rushing through the process increases the risk of accidents. Slow, deliberate drilling is more likely to result in a clean hole.
Highlight the Importance of Patience and Minimal Force:
Patience and minimal force are the keys to preventing cracks and breakages during the drilling process. Rushing or applying excessive pressure can cause irreversible damage to your ceramic pot. Take your time, follow the steps meticulously, and remember that gentle, controlled drilling is the safest approach.
By adhering to these techniques and emphasizing patience and minimal force, you can successfully drill a hole in your ceramic pot without compromising its structural integrity.
Finishing Touches
After successfully drilling a hole in your ceramic pot, it’s important to complete the process by ensuring that the edges of the hole are smooth and that any remaining ceramic dust or debris is removed. Here’s how to do it:
A. How to Smoothen the Edges of the Drilled Hole:
- Inspect the Hole: Examine the edges of the drilled hole to check for any sharp or uneven edges that may pose a risk to your plants or fingers.
- Use Sandpaper: To smoothen the edges, gently sand the inside and outside of the hole with fine-grit sandpaper. Move the sandpaper in a circular motion to even out any roughness.
- Clean the Pot: After sanding, wipe the pot clean with a damp cloth to remove any sanding residue. Ensure that the pot is completely dry before placing your plant inside.
B. Removing Any Remaining Ceramic Dust or Debris:
- Blow or Brush Away Dust: Use a can of compressed air or a soft brush to blow or brush away any remaining ceramic dust or debris from both the inside and outside of the pot. Be thorough to avoid contamination of your soil.
- Rinse the Pot: Rinse the pot with clean water to remove any residual dust or particles. Allow it to air dry completely before adding soil and your plant.
Completing these finishing touches ensures that your ceramic pot is ready for planting without any rough edges or debris that might hinder the health of your plant or pose a safety risk. Your successfully drilled pot is now ready to house your greenery or serve as a decorative piece for your home or garden.
How to Drill a Drainage Hole in a Ceramic Flower Pot or Planter
Drilling a drainage hole in a ceramic flower pot or planter is essential for maintaining healthy plants. Here’s a concise guide:
- Gather Your Tools: You’ll need safety gear, a diamond-tipped drill bit, a cordless drill, water, a pencil, painter’s tape, and fine-grit sandpaper.
- Mark and Prepare: Mark the spot for the hole and secure the pot. Use painter’s tape for protection.
- Start Drilling: Begin at a low speed, maintaining a slight angle and adding water for cooling.
- Gradual Progress: Increase the drill speed as the hole forms, and monitor carefully.
- Finish and Smooth: Withdraw the drill bit, smoothen the edges with sandpaper, clean, and dry the pot.
By following these steps, you’ll ensure proper drainage for your ceramic planter, promoting healthier plants.
How can I drill holes in ceramic pots without drilling?
Drilling holes in ceramic pots without using an actual drill is possible, but it may require some alternative methods that are not as precise or efficient. Here are a couple of methods you can try:
Use a Hammer and Nail:
This method involves creating a hole in the ceramic pot by using a nail and a hammer. Here’s how to do it:
- Materials Needed: Ceramic pot, a nail, a hammer, safety glasses or goggles, work gloves, and a piece of scrap wood.
- Safety First: Put on safety glasses or goggles and work gloves to protect yourself during the process.
- Mark the Spot: Use a pencil or marker to mark the exact spot where you want the hole. Ensure that the spot is centered and takes into consideration the specific plant’s needs.
- Place on Scrap Wood: Position the ceramic pot upside down on a piece of scrap wood. The scrap wood will act as a support surface.
- Start Tapping: Hold the nail against the marked spot on the ceramic pot and tap it gently with a hammer. Be patient and use minimal force to avoid cracking the pot.
- Rotate and Tap: Continue tapping the nail while rotating it slightly to create a hole. Keep the pressure even and controlled.
- Check Progress: Periodically check the inside of the pot to see if you’ve created a hole all the way through. If not, continue tapping.
- Smoothen Edges: After creating the hole, use sandpaper to smoothen the edges both inside and outside of the pot.
Please note that this method may not be as precise as drilling, and there’s a higher risk of chipping or cracking the pot. It’s best suited for smaller pots and simple projects.
Ceramic Pot with Built-in Reservoir:
If you want to avoid drilling altogether, consider using ceramic pots with built-in reservoirs or self-watering pots. These pots have a water reservoir at the bottom that allows excess water to collect without the need for additional holes. This can help prevent overwatering while ensuring proper drainage.
While these methods can work for creating drainage in ceramic pots, using a drill with a diamond-tipped bit remains the most precise and efficient way to ensure proper drainage without risking damage to your pot. If possible, it’s recommended to use a drill for the best results.
FAQ’s
Certainly! Here are some frequently asked questions (FAQs) regarding how to drill holes in ceramic pots:
Can I use a regular drill bit for ceramic pots?
It’s not recommended. Regular drill bits are not designed for ceramics and may not be effective. It’s best to use a diamond-tipped drill bit specifically designed for ceramics.
How do I prevent the pot from cracking while drilling?
To prevent cracking, use a diamond-tipped drill bit, maintain a steady but gentle pressure, keep the drilling area lubricated with water, and ensure the pot is dry before drilling.
Can I drill holes in glazed ceramic pots?
Yes, you can drill holes in glazed ceramic pots. The process is the same as drilling unglazed ceramic pots. Use a diamond-tipped drill bit for best results.
What size drill bit should I use for drainage holes?
The size of the drill bit depends on your plant’s needs. For most pots, a 1/4-inch or 1/2-inch drill bit should suffice, but adjust the size based on your plant’s size and water requirements.
How can I smoothen the edges of the drilled hole?
Use fine-grit sandpaper to gently sand both the inside and outside edges of the hole. This will smoothen any rough edges.
Can I use a hand drill instead of a cordless drill?
While a hand drill can be used, a cordless drill with adjustable speed settings is recommended for better control and efficiency.
What is the purpose of taping the drilling spot?
Taping the spot helps prevent the drill bit from slipping and minimizes chipping. It also provides a guide for drilling.
How do I clean the pot after drilling?
Remove any tape residue, and clean the pot with a damp cloth. Ensure the pot is completely dry before adding soil and your plant.
Can I drill holes in ceramic pots without a drill?
While it’s possible to create holes without a drill using alternative methods, they may not be as precise or efficient as using a drill with a diamond-tipped bit.
Are there any alternative methods for creating drainage in ceramic pots?
Some alternatives include using pots with built-in reservoirs or self-watering pots that don’t require drilling. You can also use a hammer and nail, but it’s less precise and may risk damaging the pot.
Conclusion
Drilling holes in ceramic pots is a practical skill that ensures proper drainage and healthier plants. Let’s recap the key steps and tips for this process:
- Start by marking the drilling spot and preparing the pot.
- Use a diamond-tipped drill bit and maintain a gentle but steady pressure.
- Keep the drilling area lubricated with water to prevent overheating.
- Gradually increase the drill speed as the hole progresses.
- Monitor your progress and be patient to avoid cracks or breakages.
- Smoothen the edges of the drilled hole for a clean finish.
- Clean the pot and ensure it’s completely dry before planting.
Now, you’re equipped with the knowledge to enhance your gardening experience. But don’t limit yourself to just drainage holes! Drilled ceramic pots have creative potential beyond planting. Consider using them as candle holders, decorative lanterns, or unique outdoor lights. The possibilities are as limitless as your imagination.
With these skills and ideas, you can transform ordinary ceramic pots into functional and stylish additions to your garden or home. Happy drilling!