We live in a world where the car is considered a sign of social success. We are surrounded by cars all the time. People tend to have the best cars and are very careful about their car’s appearance. But, as we all know perfection doesn’t exist. Our cars get encountered with scratches and stains. This created a big problem for a long time but now it’s an era of ceramics. The cars are coated with ceramics which protects them from stains and scratches. So we need to know how to ceramic coat a car.
How to ceramic coat a car?
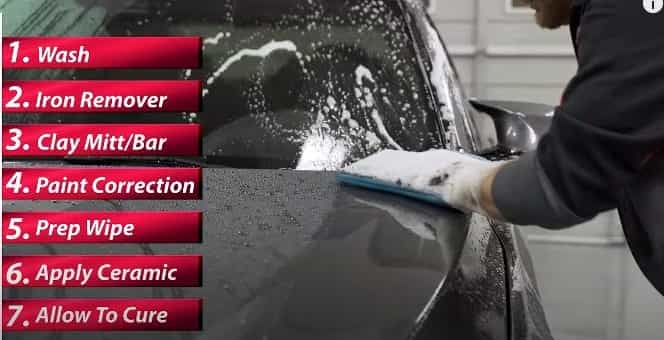
Ceramic is coated on the surface of the car in different steps. Well discuss them all one by one
- Preparing the initial wok.
- Applying the coating
- Curing process
- DIY ceramic coating
- Wrapping
Step 1: The Preparation Work
Before starting the actual process there are many recommendations that people follow. The preparation work starts with the following methods.
Washing the car
The car is washed before the process. The car is washed so clean that no sign of debris or anything that could affect the coating process is left over the surface. There are many methods of cleaning the car you are familiar with. The car washing mainly implies the removal of grime and surface dirt. You can understand simply by this example that you are cleaning or polishing a canvass upon which you will paint.
Clay Bar Treatment
When the surface washing is done, the clay bar treatment is done. Surface scars are washed away in the previously mentioned process but deep scars are removed with help of clay bar treatment. In this method, we use a clay bar, which is blended with soap or any washing material and applied to the whole surface of the car. This removes the imperfections leftover while the washing process. It reduces the water spots from the surface and keeps the vehicle clean.
In order to fulfill the small scratches and holes on the surface of the car, it is important to apply this clay treatment. This is used to create a strong shield of protection around the whole surface. For the superior hydraulic properties of car paint, this is what we use.
Polishing Process Done by Hand
In this step, DIY is used. It is designed to polish the surface of the car. It just polishes the existing surface of the car. So before applying the ceramic coating the surface must not include scratches.
One of the biggest circulating lies about DIY ceramic coating is that it is used to improve or fix the car paint. The DIY is used as protection. It is only used to cover the existing paint and it provides a shield so that the inner layer should remain unaffected. Paint correction is done before the application of actual ceramic dye.
IPA wipe down
This is the final step in the preparation work. It includes the washing of the entire vehicle with an IPA solution. This helps to remove all the lubricants, chemicals, and waxes from the vehicle surface.
Related Articles: Mothers ceramic coating review
Step 2: Application of The Ceramic Coating
The next step includes the application of ceramic coatings. The coating is generally done after keeping the vehicle untouched for three hours after preparation work. This reduces the surface temperature. For this, the vehicle is standing in direct sunlight for at least three hours a day. The condition for coating is that the surface should be smoothly cleaned.
Things you going to need:
- Microfiber buffering towel: It is used to remove the excess liquid from the surface.
- Nitrile gloves: Ceramics cause no harm. But still, it’s good to wear gloves.
- Applicator suede cloths: it is actually wrapped around the applicator sponge:
- Bottle of armor shield IX: they are best for mid-sized sedans
- Applicator sponge: This liquid is spread on the surface with help of a cloth.
Applying the drops | Ceramic coat a car
- Took a small black cloth and wrap it around the application sponge.
- Take the bottle. Put many drops on the cloth until it saturates.
Wipe on
- The next step is wiping the whole vehicle. It should be done in small sections to ensure that paint is evenly distributed on the vehicle. Therefore, wiping the vehicle in small sections is implied.
- Wipe a thin layer on the car surface. It is advisable to complete firstly in a horizontal pattern and then in a vertical pattern. This pattern ensures that wiping has been applied to all sections evenly, also there will be no chance of any part left unwiped.
- Continue to spread in a crisscross manner. Do this until you cover all the sections completely.
Once the coating has been applied to each section, left it for some time.
Bluffing Off
Being the final step of applying a coating, it implies the bluffing off all the paint. There is a relation between temperature and imparting the paint on the surface. When it’s hot more than a requirement, crystallization of imparted pain occurs and results are not satisfactory. So the recommended shield is ARMOR SHIELD IX coating.
Step 3: Ceramic Coated Cars Curing Process
Every ceramic coating is unique with its own aspects. The recommendations given by manufacturers must be followed in this regard. Every ceramic shield has its own principles like in ARMOR SHIELD IX, it is recommended to give a stand to a vehicle for about 24-48 hours. It is basically done for saving the car from moisture, water drops including rain.
The correctly applied ARMOR SHIELD IX is so durable that It will save your car for 5 years from bird droppings and other contaminants as well.
Step 4: Care After Ceramic Coating
Once your ceramic coating has been done, you are free to go outside in an open environment. Many ceramic coating manufacturers strongly recommend the after-care spray. But if u have used a good quality DIY, you don’t need any after-care spray.
Wrapping it up
It is quite a simple process to apply ceramics. We don’t need high-class knowledge or degrees in painting. But if the surface has deep scratches then it is strongly recommended to get DIY by some professional hands. It is the last process to ending our how to ceramic coat a car article. We hope you enjoyed reading our tips. Comment below your ceramic coating car experience with us.